Christmas is coming! Mid-November and it's Christmas?! That's right, it's never too early to start in the DIY sector, right?
Do you like to give away and send small things as gifts as I do?
In this tutorial I'll show you the idea I had for this.
An advent wreath to go . It consists of eight individual parts that you can even send with four tea lights and a small box of matches in a small bubble envelope. After unpacking, all you have to do is put the Advent wreath together and place the tea lights in the candle holders.
What do you need for your Advent wreath to go:
- poplar plywood
- gray glazed poplar plywood
- wood glue
- Spray paint, for example edding permanent spray fine copper
- four tea lights
- matches
- a bubble envelope
Plywood Pack of 5
Sale price
From € 31,90 EUR

Mr Beam poplar plywood coloured (different colours)
Sale price
From € 21,90 EUR

Plywood birch 5 pack
Sale price
€ 49,90 EUR
Make your Advent wreath to go
Open the theme store. Have you already discovered how many new files there are?
Load the Advent wreath to go from the design store into your work area.
There you share the file.
Because initially, only the wreath made of gray glazed poplar plywood is lasered. Of course, you can also glaze it yourself or, like me, you can take the finished wood from the Mr Beam Shop.
The settings for lasering the wreath are already stored under "Poplar plywood" in BeamOS .
Then you take out the wreath. The basis for the Advent wreath is already finished, but the beautiful decoration is still missing.

Laser and paint the decoration for your Advent wreath to go
To do this, place the poplar plywood in your Mr Beam. Because the remaining elements, i.e. the stars and the forest, are now lasered from it.

To do this, remove the wreath from the work area in BeamOS and reload the Advent wreath to go file. Split again, but this time remove the wreath.
Start the laser job with the known settings for poplar plywood.
Idea: You can also engrave your Advent wreath to go.
Personalize it with a greeting or a wish. Decorate it with Christmas motifs or with "Advent, Advent, a little light is burning."
There are no limits to your creativity here.
Give your advent wreath a personal touch.
When your Mr Beam has finished lasering the entire decoration for your Advent wreath to go, you get everything out. You don't need the cut-out deer for the Advent wreath - but maybe as a decorative element for the envelope to send or an enclosed Christmas card ?! Therefore, carefully push it out of your decorative forest - the antlers can break quickly.

Now it's time to paint with the spray paint. You already know it from my previous tutorials:
- Paint in a place protected from wind and rain.
- To protect your surroundings, use a paint booth or a large enough box on its side.
- Prepare your spray according to the manufacturer's directions for use:
- If present, remove the safety ring by detaching the spray head and prying up the ring with a screwdriver.
- The spray can must be shaken well before use. Around three minutes is often given. The mixing balls usually included should be easily audible when shaken. Even in between short breaks in painting, you should shake up the paint again and again. This applies in particular to paints with metallic particles, in order to always ensure even distribution when painting.
- When painting, keep to the distance specified by the manufacturer.
- Paint in several thin layers, which you always let dry in between.
- When you're done, let everything dry well.
Finish your advent calendar to go
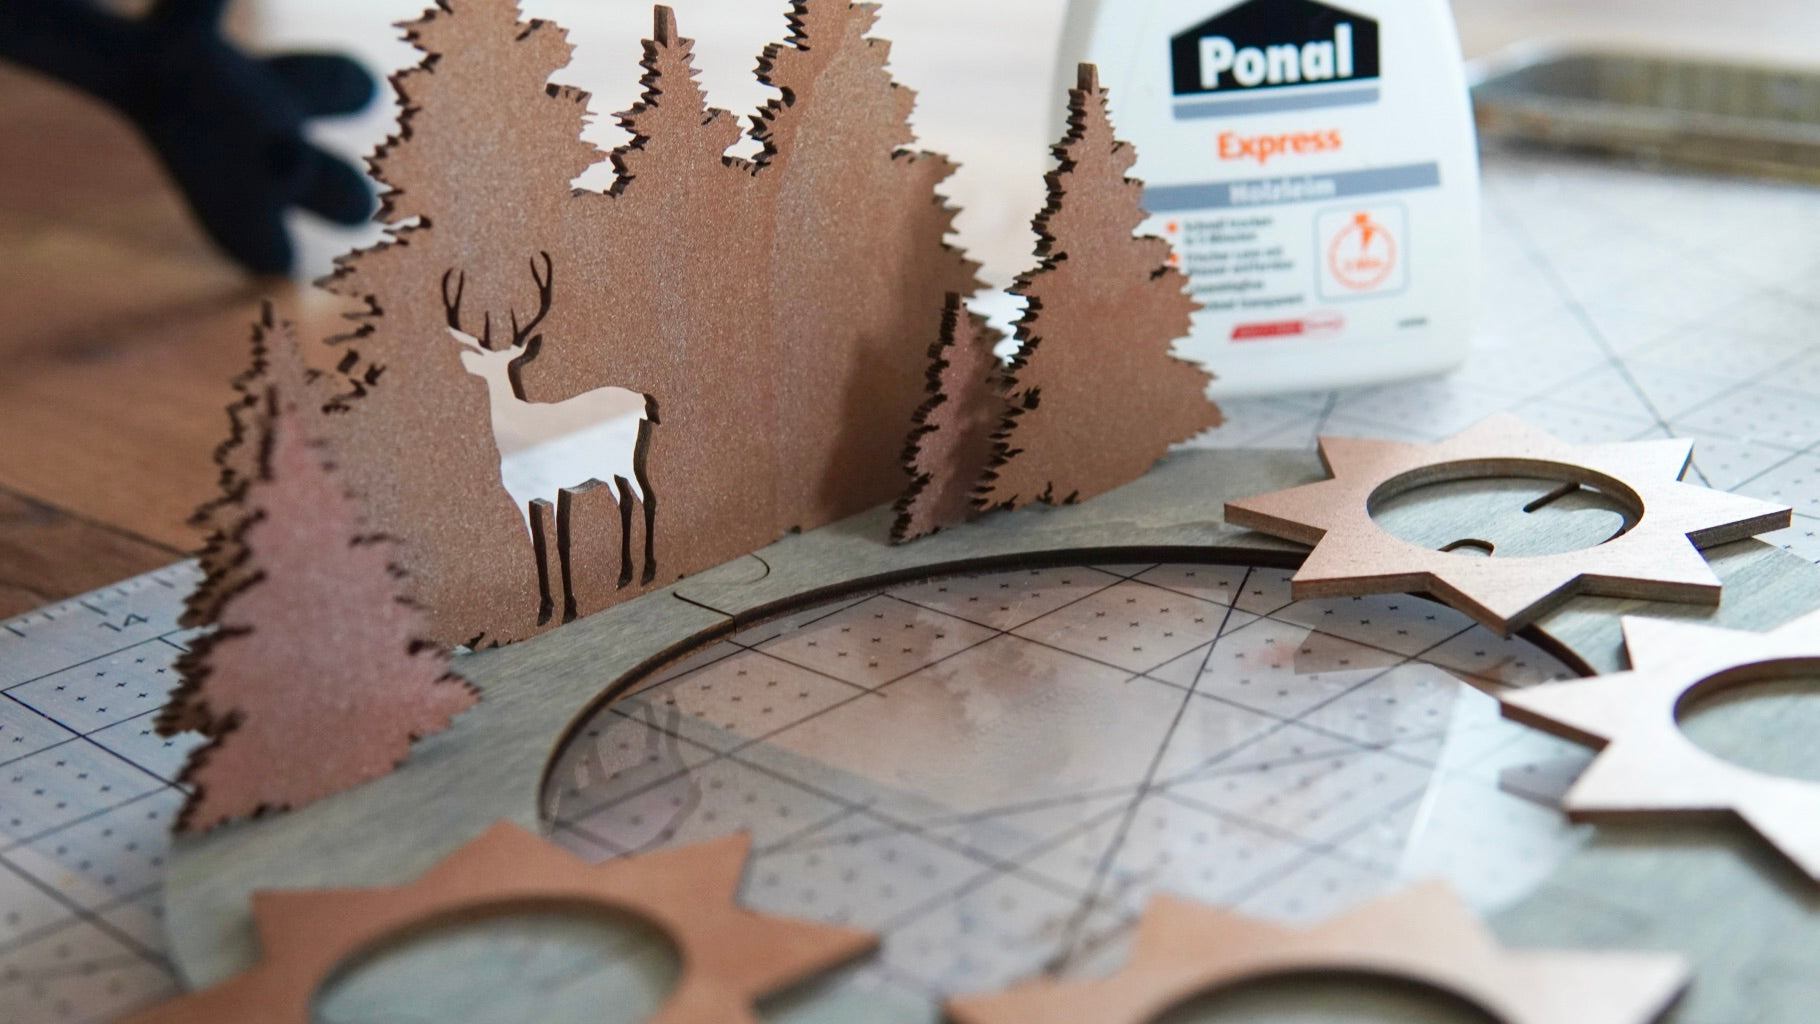
Get all the parts ready. Now you need the wood glue.
Assemble the base of your DIY advent wreath and place the tea light holders where you want to glue them.
To cover as many connections as possible, glue two of the four stars to the horizontal connections.
But remember: Make sure to only glue the poinsettias on one side of the connection! Otherwise, you won't be able to take the wreath apart after gluing to save space when sending it.
To do this, apply glue to just one half of the star and press it into place on the base.
You do the same on the opposite side.

Distribute the other two stars of your Advent wreath evenly on the front part of your wreath and glue them in place.

The glue now has to dry and your Advent wreath to go is ready.
Another idea: tea lights with a surprise effect
All you need is a printer, strong paper and scissors.
Create a circle with the diameter of a tea light in your graphics program, such as Adobe Illustrator.
This is usually about 39 mm.
In this circle you now add a motif, a saying or the numbers 1 to 4 to match an Advent wreath.
I used the poinsettia from mom's stuff as a background image in addition to the numbers. You print this on the thick copy paper and cut out the circle.
Now you need to disassemble your tea light .

Mark the hole in the paper you need for the wick by placing the wax on the circle and piercing the wick guide with a thin, pointed object.
You have to enlarge the resulting small hole so that you can put the wick through it. You can do this with a punch or sharp scissors.

Likewise, you now put your circle on the wick and reassemble your tea light.
If you now light the tea light and melt the wax, your hidden message will appear.

Send joy - an Advent wreath to go goes on a journey
To do this, stack all the elements on top of each other and slide them into the envelope.
Next to it, you slide in the tea lights and the matches.
Glue it shut, address it, stamp it sufficiently and off to the next mailbox.
Would you like to learn more about the history of the Advent wreath? Then this article is just right for you!

I wish you a lot of fun imitating it - and the lucky recipient of your Advent wreath to go a lot of joy with it!
Your Rina