A signpost can be a great way to guide your guests, organize the celebrations, and provide orientation around your wedding location.
Here are a few tips on how to create a signpost for a wedding:
- Planning: Before you start creating the signpost, you should think about where you want the signpost to be placed and what information you want to find on it.
- Material: You can make your signpost out of wood, cardboard or other materials. It should only always match the rest of the style of the decoration, and of course it should also be sufficiently stable. So I recommend wood.
- Lettering: Use clear, legible lettering that is large enough on the arrows to be legible from a distance. Label them with important points or places, such as "dance floor", "bar" and also the drink return, the "local".
- Colour scheme: When choosing a colour scheme, you should definitely choose colours that match the wedding and at the same time provide a good contrast between the text and the background.
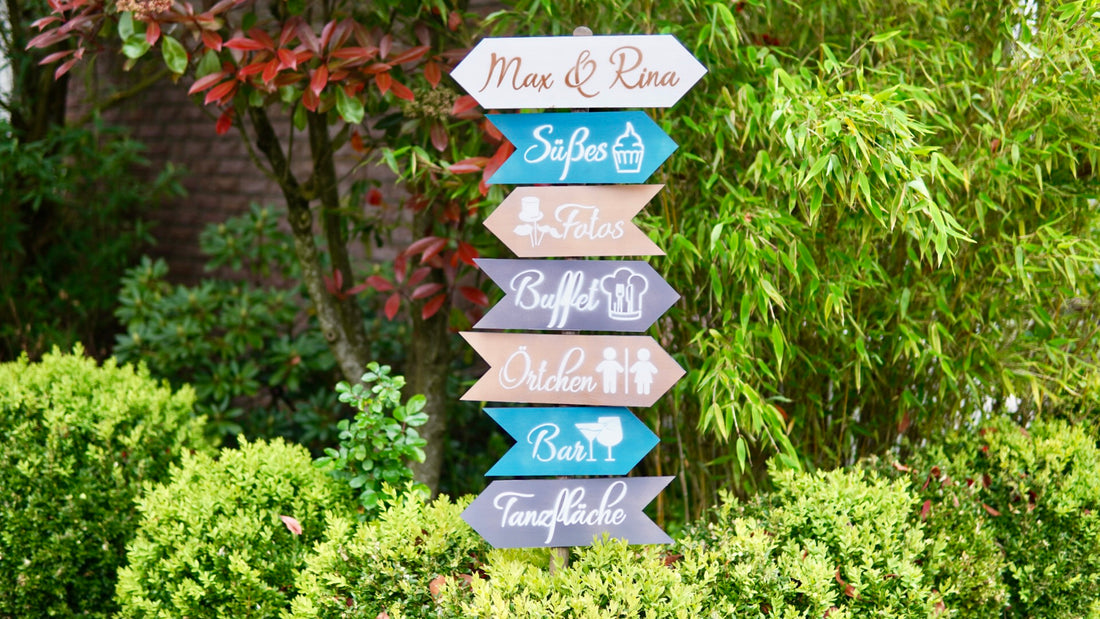
- Personalization: You can also add personalized details, such as the date of the celebration or the names of the bride and groom. Each sign can also be supplemented with an icon that matches the respective signpost, for example a chef's hat with cutlery to indicate the live cooking buffet.
If you have thought about how your DIY signpost should look like with the help of my tips, you can start crafting.
Material for your DIY guide to the wedding

- Poplar plywood in 4 mm or birch plywood in 3 mm.
- Kraft paper
- Spray paint in the colours of your choice.
- Optional clear coat for spraying as weather protection.
- Masking tape
- a long staff to which your signposts may be attached.
- Wood glue, waterproof if possible.
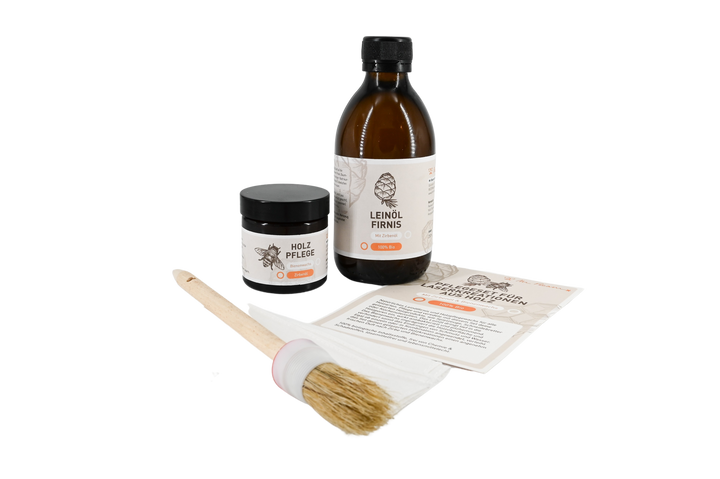
Mr Beam wood care set with stone pine oil and beeswax
Sale price
CHF 30.00
Plywood Pack of 5
Sale price
From CHF 30.00

Mr Beam Poplar plywood suitable for [x], 4mm, A3
Sale price
From CHF 34.00
Create a file for the DIY signposts
In your graphics program, for example Adobe Illustrator or Affinity Designer, create the arrows for your wooden signpost to the wedding.
They can look very different.

For my DIY signpost I have a sign with the names of the bride and groom and signposts with “bar”, “buffet”, “place”, “dance floor”, “sweets” and “photos”.
You can either paint the arrows freehand, engrave them into the wood, or laser a stencil and then paint it with spray paint.
Advantages of engraving:
- Goes fast.
- On a light background, it is a clear, dark contrast.
Disadvantages of engraving:
- The wood is no longer varnished at this point, it is then more susceptible to the weather if it rains a bit at the party. You can counteract this with the Mr Beam wood care set, as it is perfect for engraved wood.
- You can only choose light backgrounds for the signposts to ensure legibility.
By labelling with a stencil, you have more colour options and weatherproof signs.
File of your guide for your wedding with a suitable template
Design your DIY signposts
You need one template for the writing for each signpost. In your graphics program, create an arrow with a lettering and, if you like, a suitable symbol. Everything together results in the cutting file for your craft paper template and also the cutting line for the Mr Beam to laser the wood.
Choose a different line colour for the font and symbols than for the signpost arrows so that you can vary the file in BeamOS more easily for the respective laser job, depending on the wood and your material for the templates.

When it comes to the font, you should make sure that it is suitable for stencils. You can tell by the fact that the letters such as an “a” or “e” are not closed, and the inner elements cannot fall out after the laser has been applied.
If you're looking for it, the term "stencil" might help. I bought the Direct Stencil font for my stencils online.
Greatness of your signposts for your wedding
In order to be legible from a distance, your signpost arrows at your wedding should be of sufficient size. My recommendation is a font height of at least 10 cm. I then adapted the height and width of the arrows to the respective word with a suitable icon.
Due to the resulting size of your signposts for your wedding, you will need to split them across multiple laser jobs. Of course, this depends on the size of your wooden panels. Approximately two to a maximum of three arrows fit on Din A3. Divide your signposts into laser jobs in your graphics program, then you can load them directly into the workspace using drag & drop and, after aligning them on your material, get started right away.

Your DIY wooden signposts are created
Your files are complete and ready to be lasered. Start your Mr Beam and start lasering the wood for your signposts.
Put your plywood in the Mr Beam and focus the laser head.
As always, make sure to set the object height in order to get the most accurate camera representation possible.

You move the cutting job of the red lines for the lasering of your wooden arrows to the field "Skip" and only cut the blue lines.

After you have lasered all the signpost arrows for your wedding, they are varnished.
Your signposts for your wedding get colour
Prepare the spray cans according to the manufacturer's instructions, and paint your signs in a place that is protected from wind and rain. In order to protect your surroundings from the paint mist, it is imperative that you work in a cardboard box or in a paint booth. I also recommend wearing disposable gloves and a mask.

Tip: Several thin layers are better, for an even result, and allow drying sufficiently between each application. While the signpost arrows are drying, you laser your stencils.
Lasered quickly: templates made of kraft paper for your signposts
I like to use kraft paper as a material for stencils. It's stable, doesn't tear when the masking tape is pulled off, and is lasered so quickly in the Mr Beam.
You should find out which laser settings are right for your kraft paper by testing.

The Mr Beam now cuts both the blue and the red cutting lines for your templates. Just focus and then be amazed! Lasering paper in the Mr Beam is just fun, it's incredibly precise and so quick.

When the background paint on your signpost has dried, attach the appropriate template with small pieces of masking tape all around and paint it again in thin layers.

After drying, loosen the masking tape and remove the stencil. Now glue your arrows to a sturdy shaft and - voilà, your DIY guide for your wedding is ready.
I wish you a lot of fun imitating - and a wonderful wedding celebration!
Your Rina


