The Mr Beam lasers wood, Kraftplex, acrylic,...and of course also clay paper. So why not use the Mr Beam for a paper project! I have - admittedly - done it far too little so far. And now I ask myself: Why?
Mr Beam and clay paper - a dream team

I myself am an "old plotter bunny" and have already seen quite a few paper projects glide through my Plotter.
But that will change now!
I stood rooted to the spot during the laser job and marvelled at how quickly and precisely Mr Beam lasered through the clay paper. - Just great!
A brief comparison to the plotter:
The duration:
In contrast to the plotter, the Mr Beam my words incredibly fast.
I don't want to know how long my plotter for this project clay paper would have needed.
The precision:
The Letters are exactly lasered. With the plotter, especially with thicker paper, there are corners or curves that are not so nicely cut or even tear out.
The only drawback while laser:
The soot. Sometimes I was able to blow it away with compressed air. Wiping is at clay paper Yes, unfortunately not an option.
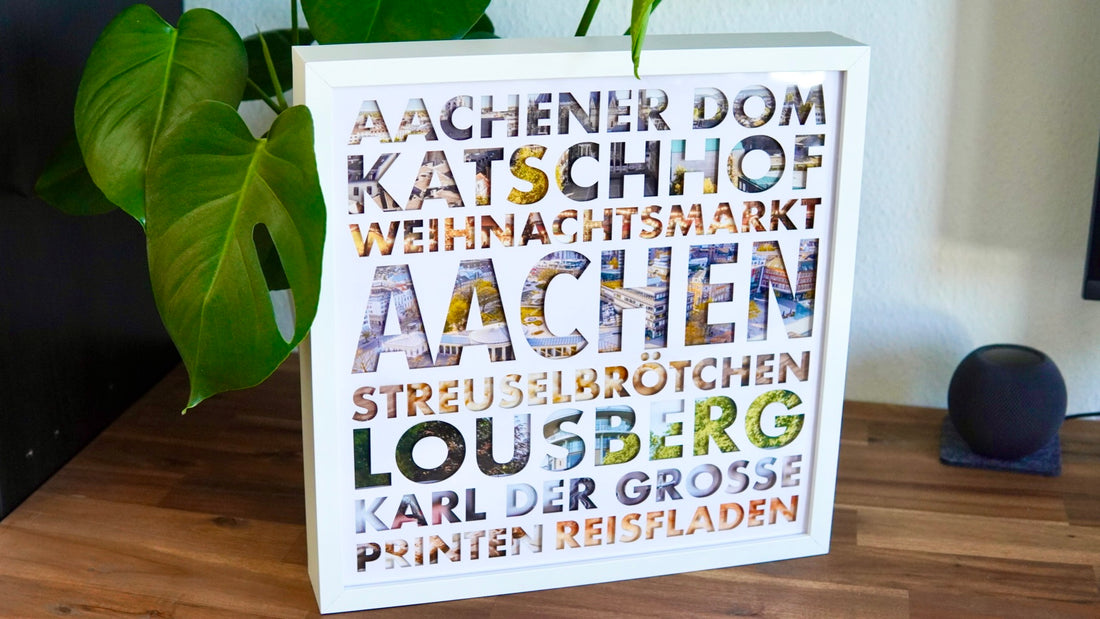
A picture frame of your favourite city
And since I am so enthusiastic about how beautiful it Mr Beam clay paper processed, show yourself in this Tutorial how you can easily get yourself Image from clay paper handcraft can.
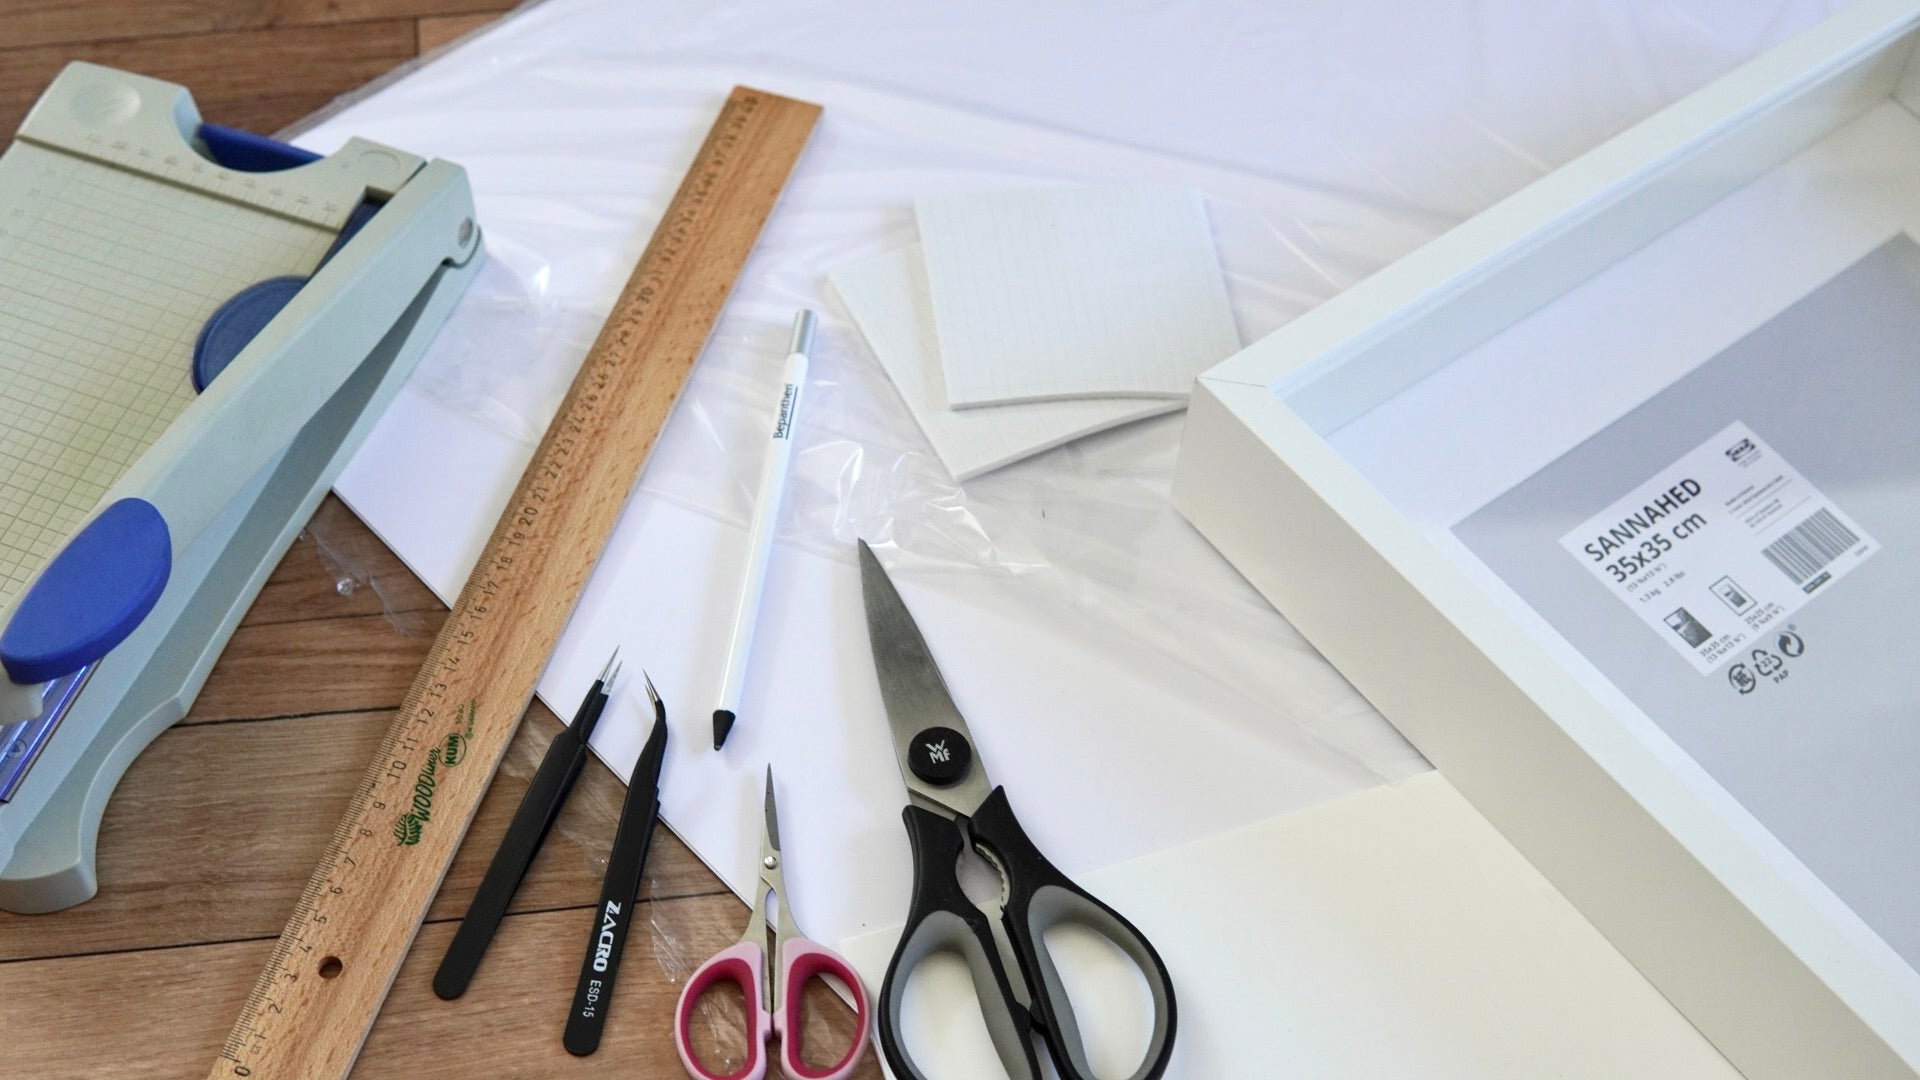
- White clay paper
- Possibly photo paper
- A deep picture frame
- Adhesive pads made of foam
- Scissors
- A tweezer
- Printer
And of course your Mr Beam Laser cutter.
What should your picture frame be about? There are no limits to your creativity. You will quickly come up with some words that are very typical of your city. Sights, personalities, or culinary delicacies.
I live in Aachen - and I love my city. That's why I show you in this tutorial how mine Aachen picture clay paper arises.
Create your template to laser
In your graphics program, e.g. Adobe Illustrator, create a square with the outer dimensions of your picture. You previously measure this on the picture frame.
Now you choose a font. The Letters should be as wide as possible, so that you can see something from the background later.
Tip: Pay attention to a simple, consistently wide, serifless font. This makes it easier to position the loose elements of your “AS, BS, DS” etc. properly again.
As a help, you can create another square in your square where you can align your words so that everyone has about the same distance to the edge. The Name of your city, Of course, as big as possible and somewhere in the middle.

You now load your finished file into your design library in BeamOS. Put yours clay paper in the Mr Beam and Fix it with magnets. Align your file in the work area and start the laser job. - It works so quickly!

Some letters hang on Lift the construction paper Still on the "silk thread", but can be easily loosened or falling simply when the construction paper is moved.

Important: Under no circumstances throw the inner parts of your “AS, BS” etc. away, because you still need them!

The background of your cityscape
You can choose a large picture of your city as the background, or - like me - almost every word with your own, associated image.
Of the Background should always be a little larger than the word itself. This way you prevent that gaps can be seen depending on the point of view.
You can on the background clay paper express. However, you take better for better print quality Matt photo paper.
If your frame is larger than your printer can handle, divide your background into sections.

To do this, find distances between your lasered letters that are so wide that the cut is not visible later.
The merging of the cityscape
First you check whether you see soot stains on the front of your construction paper. If so, carefully remove it with a soft cloth.
For the beautiful, spatial effect, glue the background with adhesive pads made of foam on both sides on your clay paper Celebration. The adhesive pads are available in different versions.

Distort around the letters. Then you remove the film and stick your background. Work your way by series.

Now, the inner elements of some letters are still missing. Turn your picture around. If your adhesive pads are too big, cut them with scissors. I found tweezers very helpful in order to be able to position the small elements of the letters more easily.

And already is yours City picture from clay paper Quasi finished. Only off in the picture frame!

Beautiful or? Tinker clay paper Can be so simple. I hope you enjoy tinkering!
Your Rina

You have the article for you Tinker clay paper favour? Then continue to follow our Mr Beam Blog. Rina regularly publishes hers DIY projects and thus ensures a lot of inspiration. - under the #madewithmrbeam Can you get further inspired by all of our users via Instagram. - Worth it! 🥰🧡


