
Especially for the most memorable time, almost no household is undecored. Whether your house is glistening and glitters in all corners and ends, it is still space for one thing: a poinsettia. If he is still done themselves and even comes out of the MR Beam, of course, the more beautiful! In this Tutorial Let's show you step by step, like you Your poinsettia wood decoration Can build yourself.
Woodvariation - the agony of choice
Eyes on the wooden number. So that all parts of your Christmas star in the end really fit together, it is important to know exactly how thick your wooden plate is. Our Template from the design gate which we introduce in the next chapter is only created for plates with a thickness of a maximum of 3 and minimum 2.9 mm. If you choose a different strength, you have to make a few customizations.
The easiest way is that wood to take from our shop, because we can guarantee you here that it is three millimeters thick and perfect for cutting suitable is. Here you have the choice between Birch-, poplar- and Pine wood. If you want to know more about plywood, we have in our blog a detailed plywood guidebook article.

Design of a Christmas star
Design store
The simplest variant to get to the design for your Christmas star is as always the way over the design gates in the MR Beam software. We have a Christmas star perfect as a wood decoration is prepared for you. He already has its own design, so you should bring your own ideas, or just want to make a little simple, you should probably try the following option.
Self-creation
The alternative to the design store is that Design of the Christmas star to create yourself. For this you use the best Adobe Illustrator or, if it should be royalty-free, Inkscape. We worked here with illustrator.
Stars
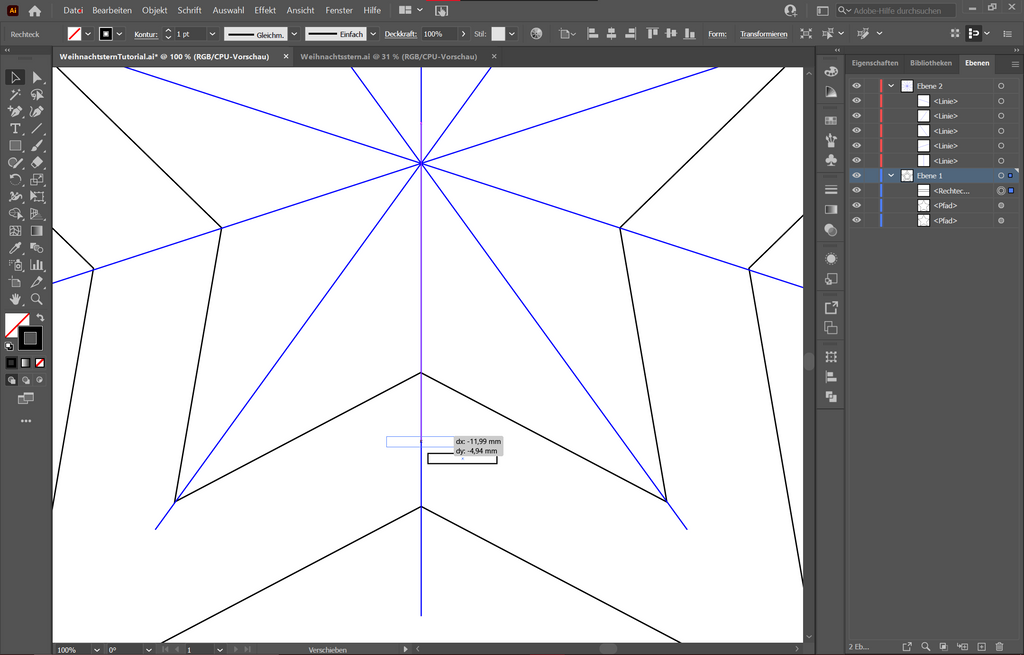
We start quite simple with two stars with different sizes, so the distance is the same size everywhere (see picture: Blue Guides). The smaller one of them are so small, so the distance between the two of the thickness, the Frame of your Christmas star Later should have. The larger defines how big your entire star becomes. If it is not set for you anyway, you can over file > Set up the document > unit Changing the units on millimeters, so you know how big the whole thing will last later. Both stars are finished and properly placed, you with the Pathfinder tool > Remove front object (Make sure that the smaller star is at least one level above the larger star) to connect to an object.


Recesses for the Christmas star
In the next step, you create the recesses in the frame, in which exactly the intermediate pieces fit.
- Best, you now measure how thick the wood is on which you want to laser afterwards.
- Our plywood made of poplar from the Shop is precisely 2.95 mm thick, so we create a rectangle with the dimensions 200 x 2.95 mm, so that the recess is later 2 cm wide (the width can of course vary, depending on how big you did the star)
Now you place it with the help of the blue guides between the two lower kinks of the stars
- Then you copy the rectangle in the Layer window four times, so you have five rectangles.
- Next, turn the star including a rectangle by 72 °. Use this Transform > Turn > Angle.
- Slide the stars and the first rotated rectangle back to the correct position marked with the guides.
- Repeat the last two steps, as long as a rectangle is placed up to all 5 kinks. Do not forget to also interrelate the rectangles already turned before turning it again.
- Now you can group all black elements so that nothing slips and finally hide the guides
Individual design
The basic shape of the star is now completed. Now it's about yours to personalize poinsettia. Here are no limits, as long as you consider that all elements, including the star frame, must be contiguous so that it does not simply fall out after the laser. Are you ready and satisfied, you copy the whole construct once and then mirror so that you have a front and back of the star.
Connectors for the Christmas star made of wood
So that your freshly designed Christmas star can also stand, you need five small connections that hold the two stars together.
- First, create a rectangle as a basic form. The dimensions should be at least big enough to accommodate a tealight. (We use 50 x 50 mm)
- Next, you set to two opposite edges of the rectangle centrally a further rectangle with the dimensions 2.9 mm times the width, which you chose for the recesses in the star (with us the 20 mm). The 2.9 mm are a bit less than the thickness of the material so that the brackets do not stand out of the star.
- Now use the Pathfinder Tool> Uniteto merge the three rectangles to an object.
- You can now copy the finished object 4 times, so you have 5 pieces of it on your workspace.
- Most recently, you can still optionally add any kind of attachment to one of the connections for a tealight or your choice of lighting.
Now you have all the parts you have for yours Personalized Christmas star wood decoration Need, consisting of two star forms with the own motif and five connectors that allow the star to stand.

On the laser, finished, go!
The digital part is complete, now it goes to the laser. Just put your chosen wood panel in the MR Beam, add your Laser file On, select the right material, and you can start. But not forget, including the Focus on laser to set it at the right height.

Assembly of the Christmas star
During the Mr Beam laser your star, you can already get the wooden glue. If the laser process is completed, you can assemble poinsettia. Wear wood glue on both sides of the small surfaces of the connecting pieces and then insert them into the recesses.
You do the whole thing With all five connectors on both sides. You should not first finish one side and then let them dry, but connect both sides directly. Otherwise, it could happen that one or the other connector sits minimally wrong, and then no longer fits on the second side. Also pay attention to attaching the connector with your tealight attachment option below.


Finally, you can still attach the tealight or just set to the lower connector.
DIY Christmas star - Perfect as decoration
This is done with that. Your personalized Wooden decoration for Christmas. Especially with individual stuff, like this Christmas star it is particularly beautiful if you share your result on social media under #madewithmrbeam with us and our community, so what are you waiting for?
Also persecute our MR Beam Blog for Tips for the Christmas decoration. How about another tutorial for your own Christmas tree decorations?
So we wish all contemplative Christmas days!


