Summer, sun, flip flops, sea, beach, popsicle - Who loves popsicle Not?
So many varieties and something for everyone. Chocolate, strawberry, vanilla, orange and if necessary also quickly made if the freezer is cleared again.
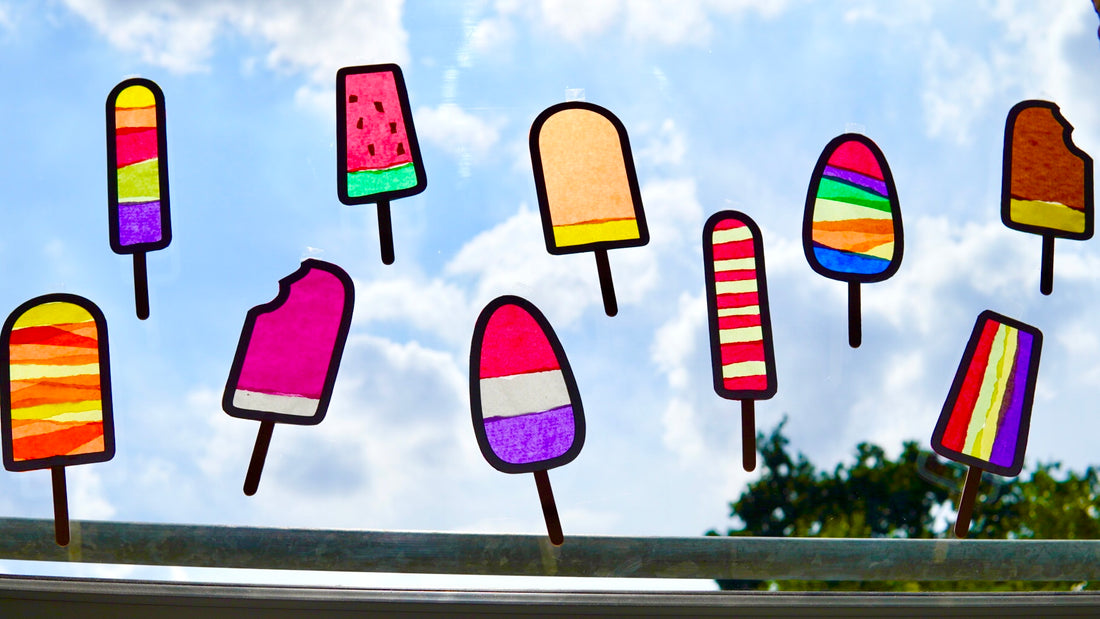
How about colourful shining popsicle Suncatcher as a window decoration for the summer? Suncatcher “catch” the sun's rays at the window, shine colourful and shell - depending on the size - everything in the room in bright colours.
Just like when creating new types of ice cream to fill up your freezer, you can let your imagination run free when tinkering the following project.
The Suncatcher By the way, you can also make great tinkering with children of all ages.
How it works? I'll show you that in this Tutorial.
What you need for your summer window decoration:
- White (or colourful) cardboard for the shape
- Colourful transparent paper
- Wooden ice cream stems
- Glue
- scissors

Ice shapes for the window decorations laser
Start yours Mr Beam And thus also that BeamOS.
The file, with the different shapes for your popsicle as window decoration in summer, you can find in Mr Beam Design store. Use your work area from there. To make it easier to position the shapes to be lasered, open your Mr Beam and place your white cardboard inside.
Fix them with magnets or weights if necessary, but make sure that you place them so that they Laser head do not hinder during the laser job.
Thanks to the camera, you can now arrange the different ice shapes on your cardboard in the BeamOS workspace. In order to get a camera image that is as accurate as possible, also set the height of your object.
If you use the rubber mats when laser, always include this at the height. Order the Ice shapes as close as possible and space-saving side by side. That saves material.

You need every shape twice so that the popsicle Suncatcher Look beautiful from both sides afterwards.
Now start the laser job. The settings for paper are stored in the BeamOS. Select the right thickness of your cardboard so that it is really lasered later. This is followed by focusing - don't forget!
If everything is ready, you can Mr Beam Close and the Start laser job.

After lasering, you get them forming ice cream for your window decoration from the Mr Beam. To put it in pairs, it is easier after gluing to find the associated shape afterwards.
Select your first couple and spread one of the shapes on one side thinly with glue.
Now it's getting colourful! -Set the Suncatcher
Now the part that you can also do well together with children begins.
Tear yours Transparent Paper in stripes or pieces. The little ones can tear transparent paper.
Glue it in a wild network. Or make a melon-popsicle, an ice cream with chocolate coating, a swirl, ... or or or ...?
The more different and more colourful Your window decoration for the summer the more beautiful it shines later in the sunlight. There are absolutely no limits to your creativity.
Around To make it easier for children to glue, can you glue the shape with transparent adhesive film beforehand. The transparent paper pieces are easier to attach for children by simply pressing the transparent paper at the desired location.
With very bright and therefore more transparent colours, I glued two layers.
For example, with yellow, white and light green. So the colour in the sunlight still shines sufficiently on the window.

Now you need the first ice cream. Depending on the size of your ice shapes for your window decoration, do you need short or long ice cream stems. The long can also be shortened with a sharp scissors to the right length.

To attach the ice cream, you wear Below in the middle of the ice shape A drop of glue and press the stem.
Finally, you carry out the second form cardboard also glue. Place it over the shape already glued with transparent paper and press it.

This Must be glued on mirror -inverted, this is particularly important when it comes to the form with the bitten ice. Pay particular attention to a clean glue at the bottom of the wooden handle, as it is thicker and heavier than the rest.
Now your window decoration for the summer still has to dry.

After drying, you cut out the protruding transparent paper along the mould all around. Is your Window decoration for the summer tinkered, can you hang them up.

Opportunities to attach your window decoration for the summer
as garland? You can pierce holes at the top and hang them on a thin thread as a garland on the window.
Tip: So that they are hanging, you should make two holes per ice. Guide the thread through the first hole and back through the second hole.
Or to a beautiful branch Or hanging staff?
So you can rotate in the wind when the window is open.
Here, too, you stab small holes in the moulds at the top and hang them on your branch with a thin thread.
Our popsicle Suncatcher as a window decoration for the summer, my children simply attached to the window with adhesive strips.

You have the tutorial for your window decoration for the summer fell by Rina? Then follow us Instagram, not to do any further articles on our Mr Beam Blog to miss.


