Of the Summer is coming to an end, it gets cooler outside and dark again in the evening. What could be nicer than cuddling with a cup of hot tea or cocoa onto the sofa while it rains and storms outside? Now it is time for autumn to move in at home with all its bright colors.
In this Tutorial I'll show you how you quickly Beautiful autumn scout can make yourself for your home. You can simply use this on the table, sprinkle them into a decorative shell or spread it around the candle in a lantern. Space decor for autumn is versatile.
What you need for your scout for autumn
For your Autumn scatter you don't need much:

- Felt in autumn colors,
such as brown, orange, yellow, red and also green.
Your felt Should have a thickness of one to two millimetres for the scouts, otherwise it will be too heavy.
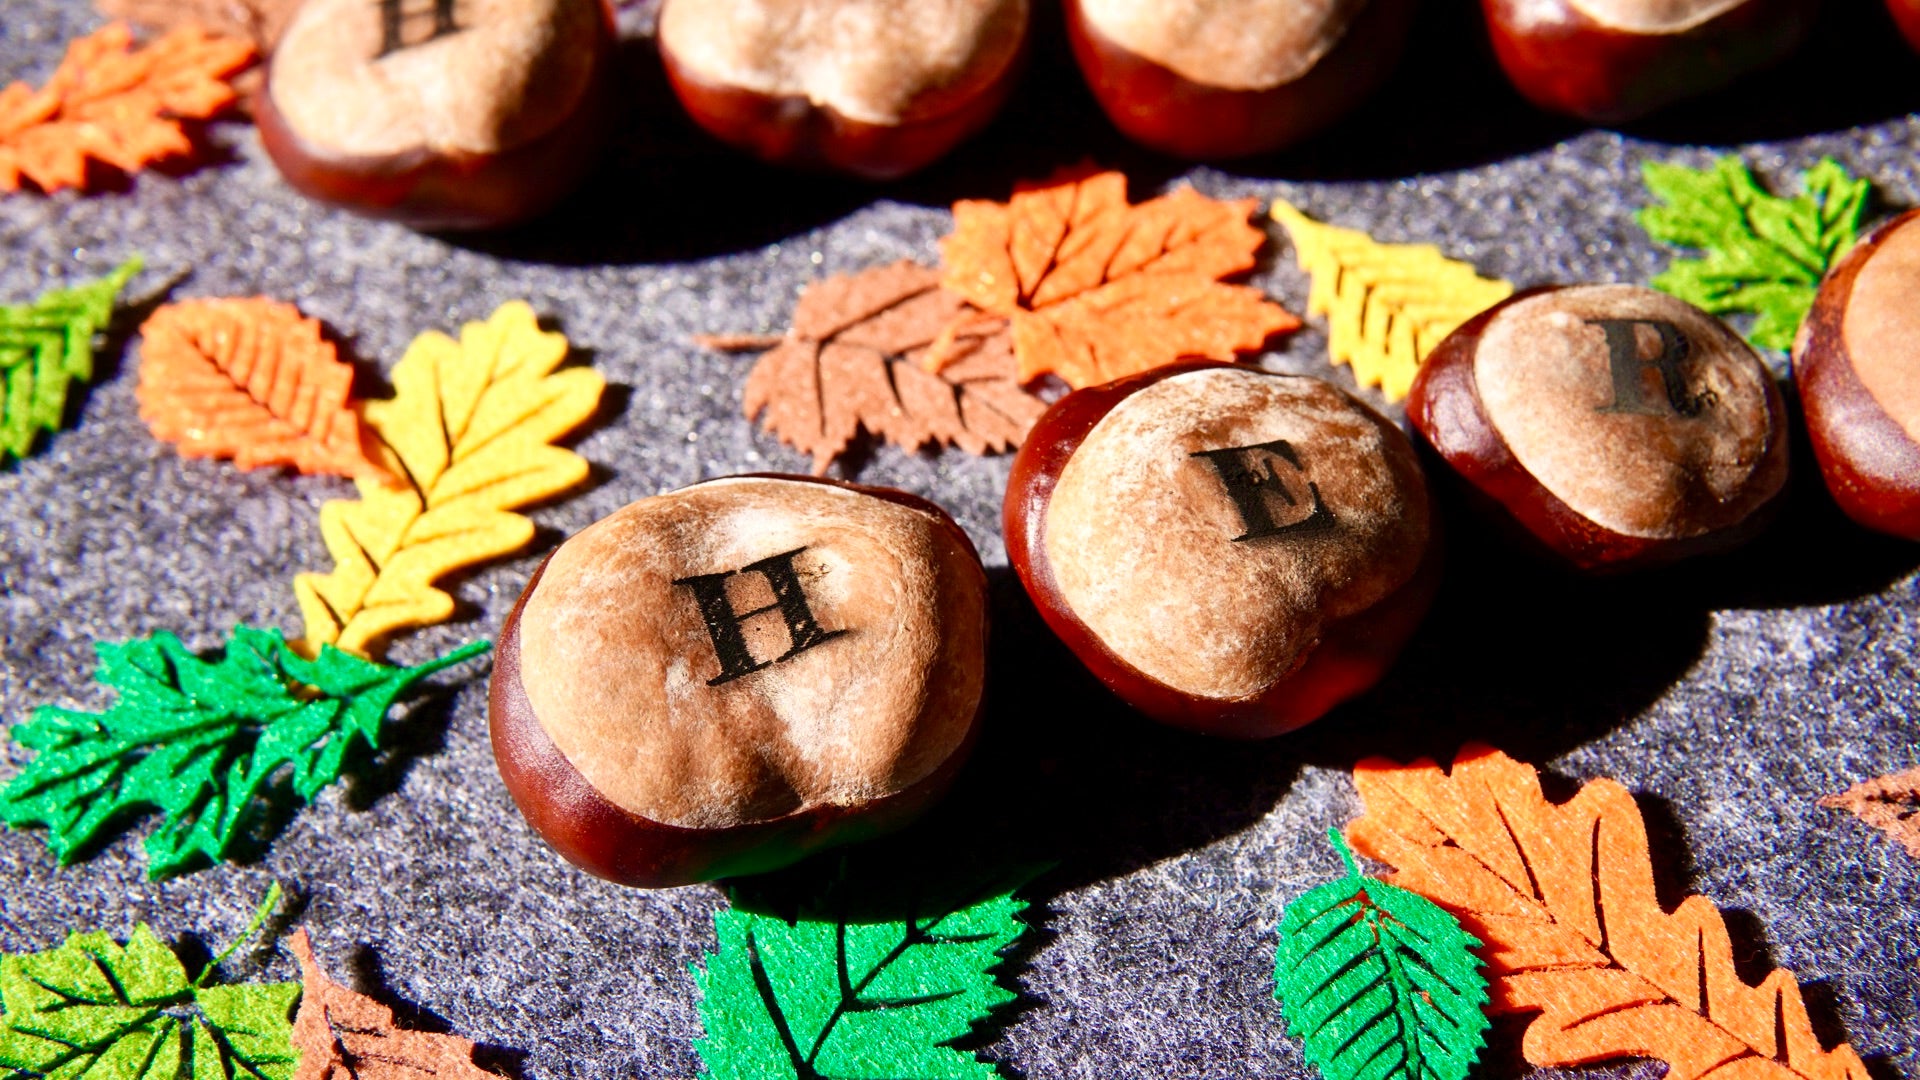
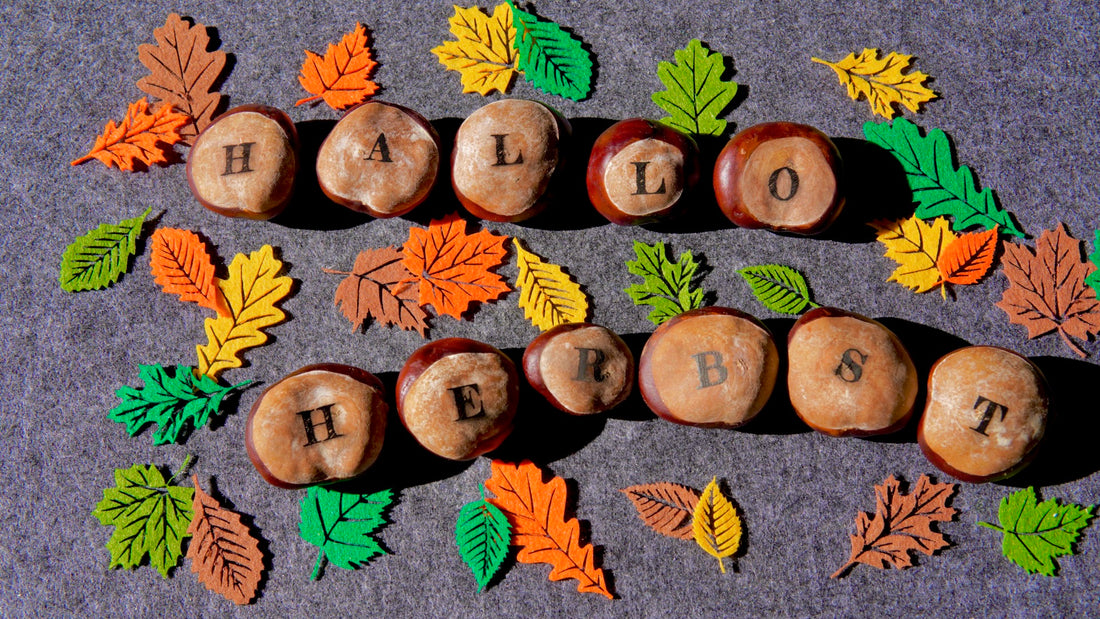
- Chestnut
When collecting the chestnuts, you should choose a nice sunny day and take a lot of time to enjoy the walk - because it sometimes comes too short, right? So, snap a bag and go, looking for a chestnut tree - and look for the most beautiful chestnuts.
To get a clearly visible engraving on your chestnuts, you have to engrave the bright spot. This should be as flat as the engraving so that the focus is right.
A push theory can help to rule out large chestnuts during the walk. Because yours, Mr Beam Can only laser up to a height of 38 mm.
For the “Hello Herbst” you need a total of eleven chestnuts.
- And of course yours Mr Beam.
And then you only need a little luck that the Beamie reproduces your collected chestnuts.
What is the navel in chestnuts?
There is also a short detour into the botany. The bright stain on the chestnuts, which you engraved, is called "navel".
Botanists refer to him as Hilum or sambar. The seed is supplied with nutrients via this navel. The white spot, like you and me, is the connecting point between seeds and tree.
Sprout decor for autumn from engraved chestnuts
Clean your chestnuts with a brush or a cloth if you should be a little earthy depending on the collection point. The navel must be clean for an even engraving.
Now it will be a bit complex, but it's worth it.
Since the focus changes in every chestnut - if only minimal - you have to engraving every chestnut individually.
Since the engraved letters on your chestnuts for yours Autumn scout are quite small, focus on deviations in the engraving picture (of course always depends on your chosen font).

Use the cutting mat for the engraving of your chestnuts
- Start yours Mr Beam and put one Cutting mat pure. Your chestnut is more stable on the cutting mat. It cannot tip over on it and does not slip as easily as on the grid.

- Direction the Navel of your chestnut for the engraving as horizontally as possible on the cutting mat.
- Control the laser head in BeamOS Via the cutting mat and then convert it to the highest possible level.
- Put the first chestnut under the laser head and focus it with the Focustool.
In BeamOS you can now create your first letter with the help of the text tool.

I have the broad font here "Fredericka the Great ” elected so that the words later at the Low decor for autumn are easy to read.
Now you can start with the engraving. After the laser job you get your chestnut out and wipe them off with a dry cloth to remove the remains from the engraving.
This is how you proceed with every chestnut until your "Hello autumn" is done.

Colourful leaves made of felt for your autumn scattered decor
Now colour comes into play for yours Low decor for autumn - Beautiful colourful autumn leaves made of felt.
I have the file for mine Low -decoration leaves bought in Mr Beam Design store However, you also find a file for beautiful Autumn leaves.
In order to have a nice autumnal, colourful pot-pourri later, I have all the leaf types each per felt colour from Mr Beam Laser.
That may not quite correspond to reality, but this was only about: the main thing is colourful and diverse!
The Settings for felt are already stored in the BeamOS. There are some different settings there depending on the colour. If your colour is not there, choose the one that comes closest to your colour.
As always, the specified settings for lasers can differ from those you need for your material.

Stick to the recommended settings, but reduce the passes for your 1 mm thick felt to one after choosing the colour. This is usually sufficient.
But I recommend one way or another always make a test cut.
This prevents frustration and especially the waste of material.
The leaf veins of yours Autumn leaves for your scatter You can both engrave and cut them.
If you engrave the leaf veins:
- The leaves are more stable for your Autumn scout.
- The leaf veins are less emphasized, rather indicated, depending on the colour.

If you the leaf veins from yours, Mr Beam can be cut:
- The leaves are significantly more unstable, are therefore better suited for lying scatter on the table Or sideboard, for example in the lantern.
- The leaf veins are very emphasized by shading. They look more spatial.
No matter what and how you do your scout, which one Natural materials You combine them, I hope you enjoy imitation - and have a nice, cosy autumn.
Your Rina