
You were able to experience a dreamlike wedding, and now you are sitting in front of all the little memories. Cards, photos, a place card, the garter, dried flowers from the bridal bouquet or small gifts and decorative elements. So much that should not just end up in a box, but in a beautiful, worthy of the occasion, box that you have designed individually.
A nice idea, isn't it? And shall I tell you something? With your Mr Beam and the Height Extension you can easily laser a beautiful souvenir box for the wedding.
Materials for the wedding keepsake box
- Wooden box with lid (without Height Extension, you should make sure that you can unscrew the lid)
- black cardboard for a template
- some masking tape to hold it in place

Mr Beam Height Extension & Cutting Frame
Sale price
£239.00 GBP
Mr Beam Pastel Acrylic, various colours, 3mm, A3
Sale price
From £13.00 GBP
Slate hearts, pack of 10
Sale price
£20.00 GBP
Thanks to Mr Beam's Height Extension, you can now easily engrave objects up to 6.8 cm high.
So you no longer have to pay attention to whether you can unscrew the lid of the wooden box in order to first remove it before engraving and then reassemble it afterwards. And then all that's missing is your personal engraving for your wedding souvenir box.
The engraving for your souvenir box for the wedding
As with any engraving, you first create a shape in your graphics program that corresponds to your memory box. This allows you to adjust the sizes and placement of the lettering and elements. In my case, the lid of the wooden box is 29 x 25 cm.

The created rectangle also serves as a template for a precisely placed engraving.
Then follows - you already know it from my cake topper for the wedding - a wreath. You can find a lot of files on the Internet at Etsy and Co.
I added the names of the wedding couple, the date and "Our Wedding" to the wreath.

For the word “our” and the date “30. October 2020” I chose the “MINIMALIST” font. The word "wedding" and "max rina" originated with "Melody Sunday" with the appropriate glyphs.

I then adjusted and arranged everything in the rectangle, which corresponds to the size of the memory box, according to my ideas. Of course, there are no limits to your creativity. When the file for the template and engraving of your wedding keepsake box is complete, save it.
A template for the exact engraving of your wedding keepsake box
And just like without the Height Extension, you still need a template for an exactly aligned engraving.
How do you first create a cardboard template and then engrave a 6.5 cm high box?
A template for engraving a high object can also be lasered with the Height Extension. However, the material is no longer cut through, only engraved. To do this, place a piece of black cardboard in your Mr Beam. The cardboard should be slightly larger than your wooden box. Fix the cardboard with some masking tape at the bottom of the Mr Beam.
Now you put the wooden box in the Mr Beam and focus the laser head on the wooden box.

You load your file into the Mr Beam software using “drag&drop” and roughly align it using the camera preview on the box. To do this, you set the working height in order to get the most accurate preview image possible. To do this, turn the focus tool with the "EXTENDED" side facing you and read the value.
In the case of my wooden box, it is 35 mm. That's the 65mm height of the box minus the 30mm of the Height Extension.

Instructions for setting the working height with the Height Extension can also be found here.
Laser cutting the template for your wedding keepsake box
Now take the wooden box out of your Mr Beam and close it.
It may look unusual at first, that the laser head hangs so high above your material, but there is no other way. You choose black paper as the material.

Of course, you skip the engraving. Since the laser beam is so completely out of focus, I reduced the speed. It is best to test beforehand which settings are suitable for your laser head and your material.

When the Mr Beam has finished the laser job, you won't see a filigree, narrow cutting line on your black cardboard as usual if the correct focus is set, but a very wide engraving line on the cardboard. This engraving will now serve as a template for your wedding keepsake box.
Engrave your wedding keepsake box
Now you can put the wooden box in the Mr Beam. To do this, place them exactly in the engraved template on the black cardboard. The laser head is already focused.

In the laser settings you choose the right type of wood for your wedding souvenir box. My wooden box is made of pine . I chose the material “birch plywood”. You have to skip the cutting job and reduce the line spacing of the engraving to 0.1 mm.
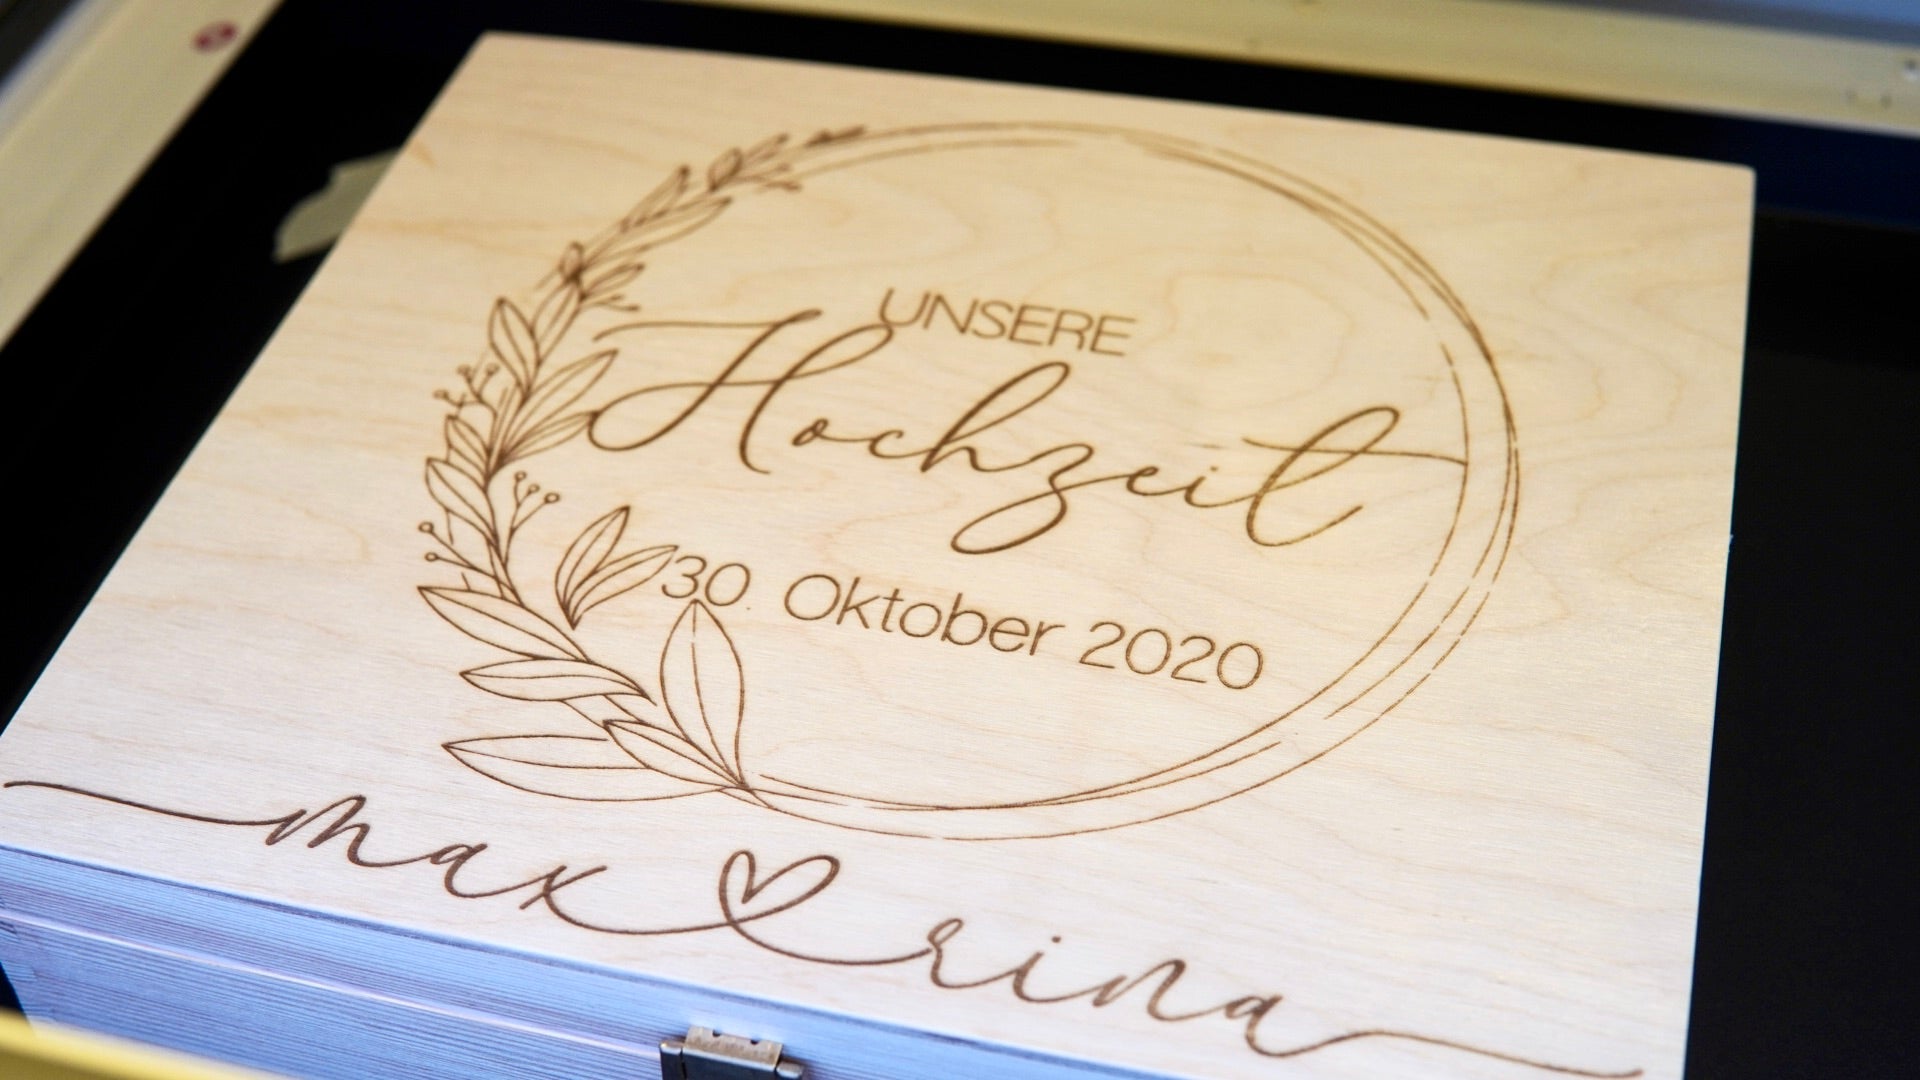
After the laser job, you can get your finished souvenir box out of the Mr Beam for the wedding. Isn't that awesome? A complete wooden box engraved in Mr Beam!
Your personalized wedding keepsake box is ready and can now be filled with all the little “treasures”.
I wish you a lot of fun imitating it - and also taking it out again and again and browsing through it :-).
Your Rina


