
If you create a normal text in Adobe Illustrator, it is purely theoretically directly ready to be loaded into the laser and edited. Of course, there is still a little more behind, otherwise we would hardly be one Tutorial to do it. So if you want to cut your text with Mr Beam and try out a few other tricks of the trade, you've definitely come to the right place!
Create text as outlines in Illustrator
In Adobe Illustrator is worked with different workspaces for different applications. To make sure you have the same windows and settings available as we, just click on the top right, in the lifter where you can close the program too "Change workspace ". Choose the work area here "Basics - Classic" out, this is enough for this scenario.
1. Create text in Adobe Illustrator
Then create a text box in which you promote your desired text. Take care of your ideas. This concerns mainly content, font and execution, as you can not change this later. For example, the size is still easily adaptable in retrospect.

2. Convert text into paths
The text, as he is currently in your document, could be considered SVG or image file exports from Mr Beam to be engraved because the text would be recognized as simple surfaces. But that's all. If you want to cut him, you have to convert him into paths. To adapt that, you have to go to the very right in the recruitment panel Rider "Properties" Call up.
In this, you can make pretty much customizations on the text you can imagine. What interested us now is the penultimate field from below, "Convert in paths". Make sure your text is really final, because after this step you can not customize it any more. So change the text now into paths by clicking on the button. Your writing is now based on vectors you can edit individually.

If you use a font that is at least partially contiguous, you should unite the letters so that it does not come to overlaps. Use the direct selection tool (A) and select all the letters that belong together. Open the Pathfinder which one in the right toolbar will find and associations the letters to an object.

3. Make text ready to cut
So the text is already almost ready for the Mr Beam Cut him. You just have to set the contour by being back in Rider "Properties" to Select a color for the contour. If you do not want the font to be engraved, you should still remove the area.

Offset Path create a text
Now we want to illuminate another scenario, which goes a step further than just the To create outlines of a text in Illustrator. Sometimes it may be that you want the text as a stand-alone cut. Then it brings you in the fewest cases something if you cut off all letters - or at least a part of it - individually. To avoid this comes the Offset Path into the game, The on top of that still creates a cool effect. This allows the text to be created with a blend background, which places all the letters on a surface.

1. Text ready for the offset
So that you Create Offset Path can, your text must also be converted into paths. So first carry out steps 1 and 2 of the upper part of this article. First, you create your desired text and then convert it into paths with a few clicks. Do not forget, associate related letters to an object. Step 3, however, do not need here, because we need the surface of the font and not the contour.
2. Create offset
So if you have your finished land of the lettering, you can make the offset effect. To do this, select the object and click on "Object"> "Path"> "Move path ..." in the upper menu bar. Then a small setting window opens in which you can adjust how wide the frame should be and what form the lines have corners. Through the little hook at the bottom left, you can also show the preview. Click on "OK" if you are satisfied with your result.

3. Refine offset
So far we have only black font on black background. Of course that's not very helpful yet, so we have to make a few adjustments. First click with Right-click on the object and lift the grouping.

This allows you to edit the objects individually. Then combine the offset surfaces with the pathfinder, as you did earlier with the letters hanging together. Now edit the entire surface according to your ideas. For example, we remove the surface and only set the contour so that it will be cut later in Mr Beam.

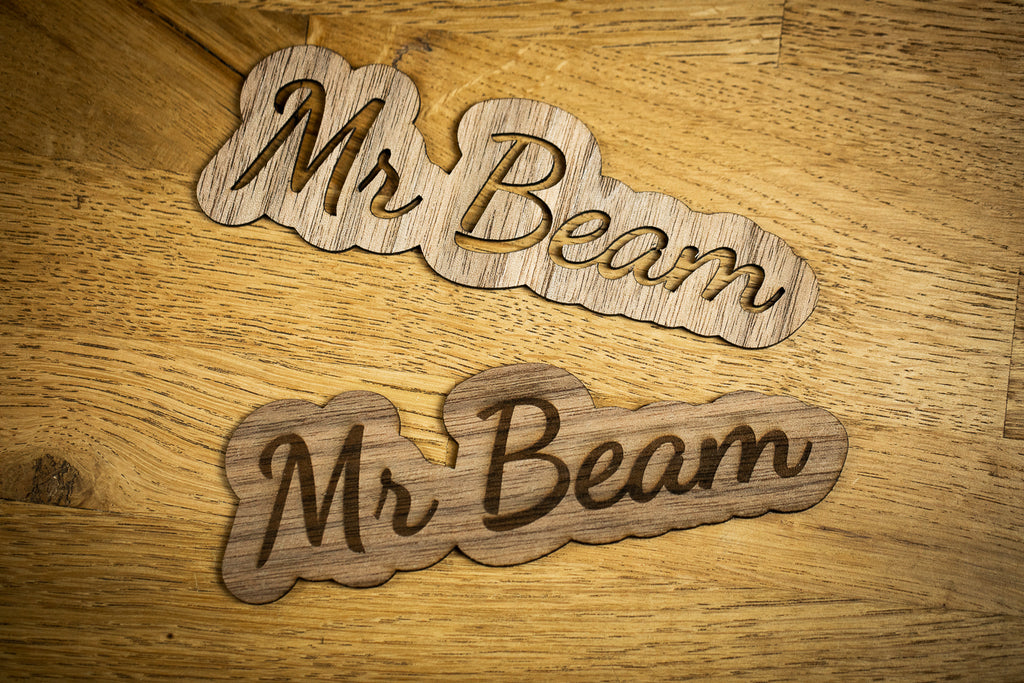
Finally, you can make adjustments to your font again, if necessary. For example, you could use the contour here and remove the surface, so that the lettering is cut out as negative, so to speak. Just as we have it now, he is simply engraved.
Create text as outlines and with offset in Illustrator
Now you have to save the file only as SVG and is already Your personalized lettering ready to be lasered! We are very excited about what you have conjured up in the end and look forward to a post on the social media platform of your choice under the hashtag #madewithmrbeam!
You have no Adobe Illustrator or may not have so much time? Then this website is probably just right for you. With the Keychain generator Can you create something quickly without previous knowledge.


