To Easter If you find them everywhere: On the breakfast table, hidden in the garden, as decoration in the Easter Bush. Easter eggs where you look. With my Easter egg template Can you let out steam creatively.
Easter eggs out wood, Paper, felt or out acrylic? The Easter egg paint, paint, glue?
Just use as a frame or thanks to an inner offset? You have so many possibilities.

In this tutorial, I'll show you how to make a great DIY multilayer wooden Easter egg from my Easter egg template. And how a stencil helps you to make it.
The #blumenkind file from Mamassachen Is particularly suitable with your multilayer letters.
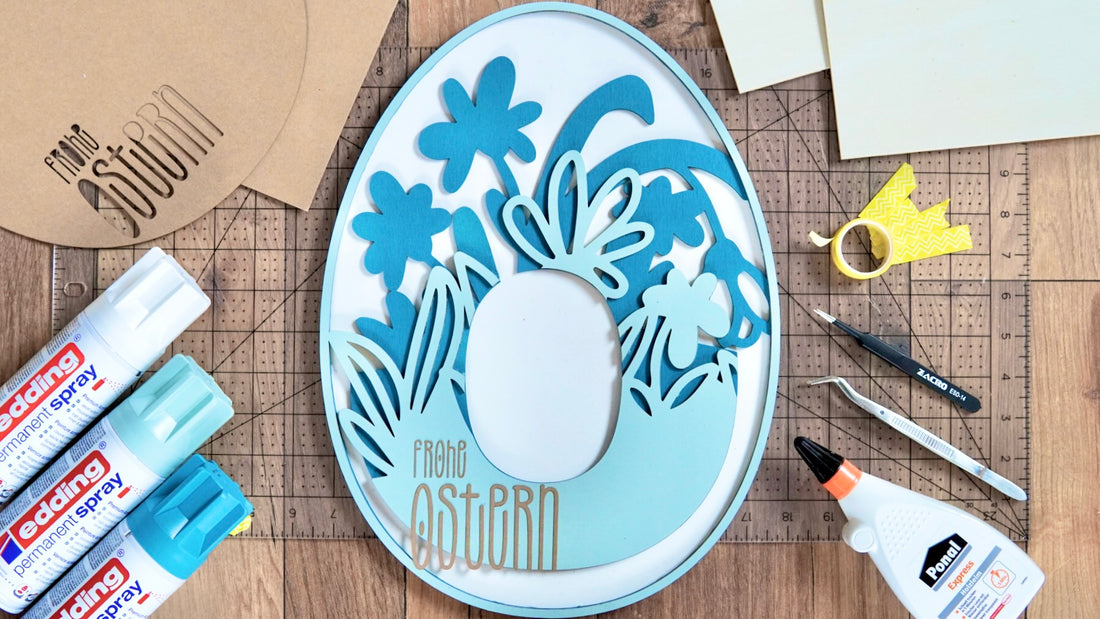
The prefabricated "Happy Easter" design fits perfectly. A big o from the #blumenkind letters with a small lettering.
For me, the Easter egg comes to the door of House entrance but smaller scaled it is also a very nice pendant for the Easter decoration or the baskets.
- Poplar wood
- Kraft paper or thicker paper for the template
- Spray paint
- Wood glue
- Tweezers for small parts
- Washitape or crepe tape
=== Product ===
pappelsperrholz-5er-pack
=== Product ===
sperrholz-birke-5er-pack
=== Product ===
mr-beam-pappelsperrholz-bunt
=== Product ===
Prepare your easter egg template to the laser
The letters of the file, in the case of O, always consist of two layers, whereby one Great 3D effect is produced. Per location, you need an Easter egg frame. You create the above-mentioned above, from the template and inner Offset.

Download the file to your graphics program, e.g. Adobe Illustrator.
To determine the sizes, you put all the layers on top of each other. The frame you draw on the graph, so he framed the O suitably. You should choose him so big that it overlaps with the graphic gives.
Now you connect a frame with one of the locations of the # Blumenkind letter.
That looks first more beautiful, and secondly, it facilitates the positioning later enormously.
The Easter egg template do you need as the bottom, on which you later adhere and as a template.
So duplicate the egg and group the little "Happy Easter" with one of the Easter eggs.
The Mr Beam and the Easter egg made of wood
Now everything has to go to your design library in BeamOs And from there just in the work area.
The template will surprise first. Then the Mr Beam Laser and you yours Cut the Easter egg made of wood.

Now that's missing "Happy Easter" And the template for each letter.
You laser the stencil from kraft paper. This is stable and thick enough to act as a template. For this, you use the lettering grouped with the Easter egg template.
If your lettering should be from kraft paper, then you can skip the next step, because then you have already lasered your letter with the template. Otherwise, you take a material of your choice, for example Kraftplex and leaves the Mr Beam still cut the "Happy Easter".
For the great effect your mulitayers still need color
Grab your spray colors and a pad and go to a wind and rain-protected area on a well-ventilated place. In the instructions of your spray cans, as you should prepare them. Your underlay, for example a large cardboard, put on the table or floor and start to paint the first layer.

Evenly and thinly paint, because: better paint twice, as run as runners.
So you go to Layer for Layer and fast has your future multilayer Easter egg made of wood get a colored painting.
The parts must now dry. The time you can find on the can of your paint or the enclosed instructions. Often it is about 30 minutes.
However, I always recommend having everything drying over night.
Merge the Easter egg of wood
When Your painted Easter egg Layer Dried, you can glue.
On a pad, you put your easter egg base plate ready and condemn the first location on the back with glue.

Put both suits on top of each other, adjust a bit when needed, before you then press hard everywhere.
Let it dry for short, so that it does not slip anymore. The same you do with the next layer.

If everything is dried and firm, you put the template on and make sure you slip with a few striped washitape or crepe tape.

Now put the letters one after the other into the template and press it firmly. Make sure that the glue does not stick the template with. Remove the template and ready.🙂

We regularly publish new articles on our Mr Beam Blog. If you follow our tutorials, we look forward to seeing your results #madewithmrbeam divide to the social media channels of your choice.


