
The time has come, and the first Christmas trees are already being put up here and there.
How is it with you? When are you putting up the Christmas tree ? I have to admit that the Christmas tree decorations are already here, but we don't have a tree yet.
So we bought some fir green and started decorating something. Simply place a few Christmas balls in the middle of the dining table or use them to create a beautiful decorative ring or wreath. It's quick and the scent of pine trees spreads everywhere in the house. In this tutorial, I'll show you how you can make a beautiful Christmas decoration ring with the Mr Beam.
Material for your Christmas decoration ring

- Metal ring in white with a diameter of approx. 30 cm
- Kraftplex in 1 - 1.5 mm thickness
- Card holder from the Mr Beam Shop
- hot glue
- Spray paint white
- golden color
- Paint brush
- Fir green
- Wire to attach the fir greenery
- a few Christmas balls and other decorations
- and if you want your decorative ring to be illuminated, then a small string of lights
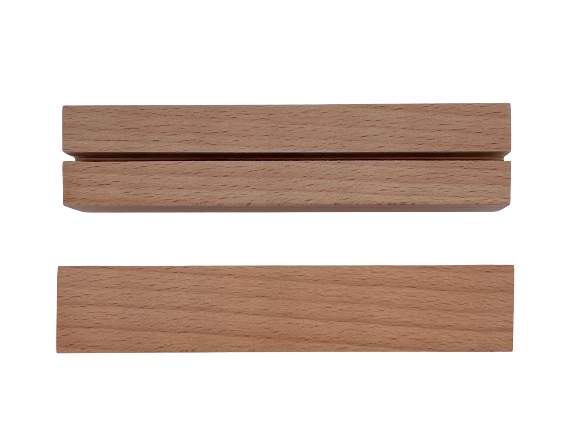
Mr Beam Card Holder of Wood (24 Pack)
Sale price
From CHF 47.00
KRAFTPLEX ST 1.0mm / 1.5mm, Pack of 5
Sale price
From CHF 21.00

KRAFTPLEX Sample package, 15-pack (0.5, 1.0 & 1.5mm)
Sale price
CHF 57.00
“Merry Christmas” for your Christmas decoration ring
Create a Christmas text for your decorative ring
In your graphics program, for example Adobe Illustrator or Affinity Designer, create a “Merry Christmas” lettering for your decorative ring. It is important that you need an outline to cut out and not a filling. Make sure that the letters are connected, the dot of the i is connected to the i and the “Merry” is connected to “Christmas”.

I chose the “Better Together” font and fused the two words so that they share a common outline and are not cut up. You can now save your Christmas lettering as an SVG .
Tip: You can get more detailed information on how best to create your own text for laser cutting in How-To: Cutting out text. Alternatively, you can also find lots of Christmas lettering to buy online.
The Mr Beam quickly lasers the Christmas lettering for your decorative ring
Now start your Mr Beam software and drag and drop the file into the workspace. Now the file is also saved in your design library.

Place the Kraftplex in the Mr B e am and then align the lettering on the Kraftplex using the camera preview. You can then access the settings via “Laser”. These are already stored in the Mr Beam software.
All you have to do is choose your material, in this case “Kraftplex”, and the right material thickness. Click “Start” and while the Mr Beam software prepares the laser job, you can focus the laser head. Then you close the Mr Beam and press the start button.

After lasering, get the Christmas lettering for your decorative ring out of the Mr Beam.
White and gold will be the Merry Christmas for your decorative ring
To paint, prepare your spray paint by shaking it well.
With a paint booth or a sufficiently large cardboard box placed on its side, you can protect yourself and those around you from the spray mist while painting.
If possible, you should paint outside or in another well-ventilated place that is windless and protected from rain. I also recommend wearing disposable gloves and a mask.

Now spray a first thin layer of the white paint, evenly and at the distance specified by the manufacturer, onto the “Merry Christmas” for your Christmas decoration ring. If the white does not provide sufficient coverage after drying, you can apply another thin layer.

After painting, it will be golden
Now use a brush to apply the gold colour to the upper part of the letters and spread the colour downwards. This creates a kind of gradient from gold to white and in the end a little more than half of the letters are covered with the gold colour.

For a harmonious overall look, make sure that the entire lettering changes between gold and white at approximately the same height. With metallic colours it is often necessary to apply a second coat to achieve even coverage of the metallic particles.

While the colour of the lettering for your decorative ring is drying, you can decorate the metal ring for Christmas.
Design your Christmas decorative ring
Fir green and lighting for your decorative ring
To do this, use the wire to tie the fir green around the metal ring, the way you like it.
Use as little wire as possible so that it is not visible afterwards.

You can optionally use the fairy lights. I like it when everything lights up a bit at Christmas time.
I started at the bottom of the decorative ring and wrapped the small string of lights around the metal ring at a distance of approx. 5 mm so that the LEDs were approximately the same distance apart.
Furthermore, I spread the remaining piece a little in the fir greenery.

Hot glue for the lettering and fixing your Christmas decoration ring
Your “Merry Christmas” lettering has dried, and you can attach it to your decorative ring with hot glue.

Did you know that most standard metal rings fit pretty well into the wooden cardholders from the Mr Beam Shop?! You can even engrave them if necessary.

Brilliant, right? As a decoration and to cover the cable of the fairy lights a little, I glued a Christmas ball and a small pine cone to the cardholder. This means that the decorative ring is also fixed at the same time.

You can now further decorate your Christmas decorative ring however you like. There are no limits to your creativity here.
I tied two gold Christmas tree baubles to the top of the decorative ring and, at my children's request, I wanted to put white cotton balls in the fir green as snowflakes.

If you are happy with your decoration, your Christmas decoration ring is ready.
Hasn't he become beautiful? I hope you have fun imitating and MERRY CHRISTMAS!
Your Rina


