Every year the same drama...lots of presents under the Christmas tree , but which one was for whom? The big blue for dad? The little red package was Grandma's present, wasn't it? Oh my, it's total chaos. How good that there are gift tags for the gift packaging that can bring a little clarity.
You probably know the typical gift tags in the form of a label, with cut-out motifs and perhaps, depending on the material, an engraving?
Very helpful in the chaos, nice to look at, but also kind of boring.
I want to show you another idea today. Lasered quickly and therefore last minute, for the very spontaneous!
Have you already read my blog article Make a Christmas decoration frame and maybe even imitated it? Then you certainly still have blocks left, because that's exactly what you need for the last minute gift tags made of wood.
Tinker gift tags out of wooden blocks?
Yes, you've read that correctly. A quick, easy and beautiful way to prevent the chaos of gifts under the Christmas tree. Because the wooden blocks only have to be engraved and lasering wood with the Mr Beam is really easy!
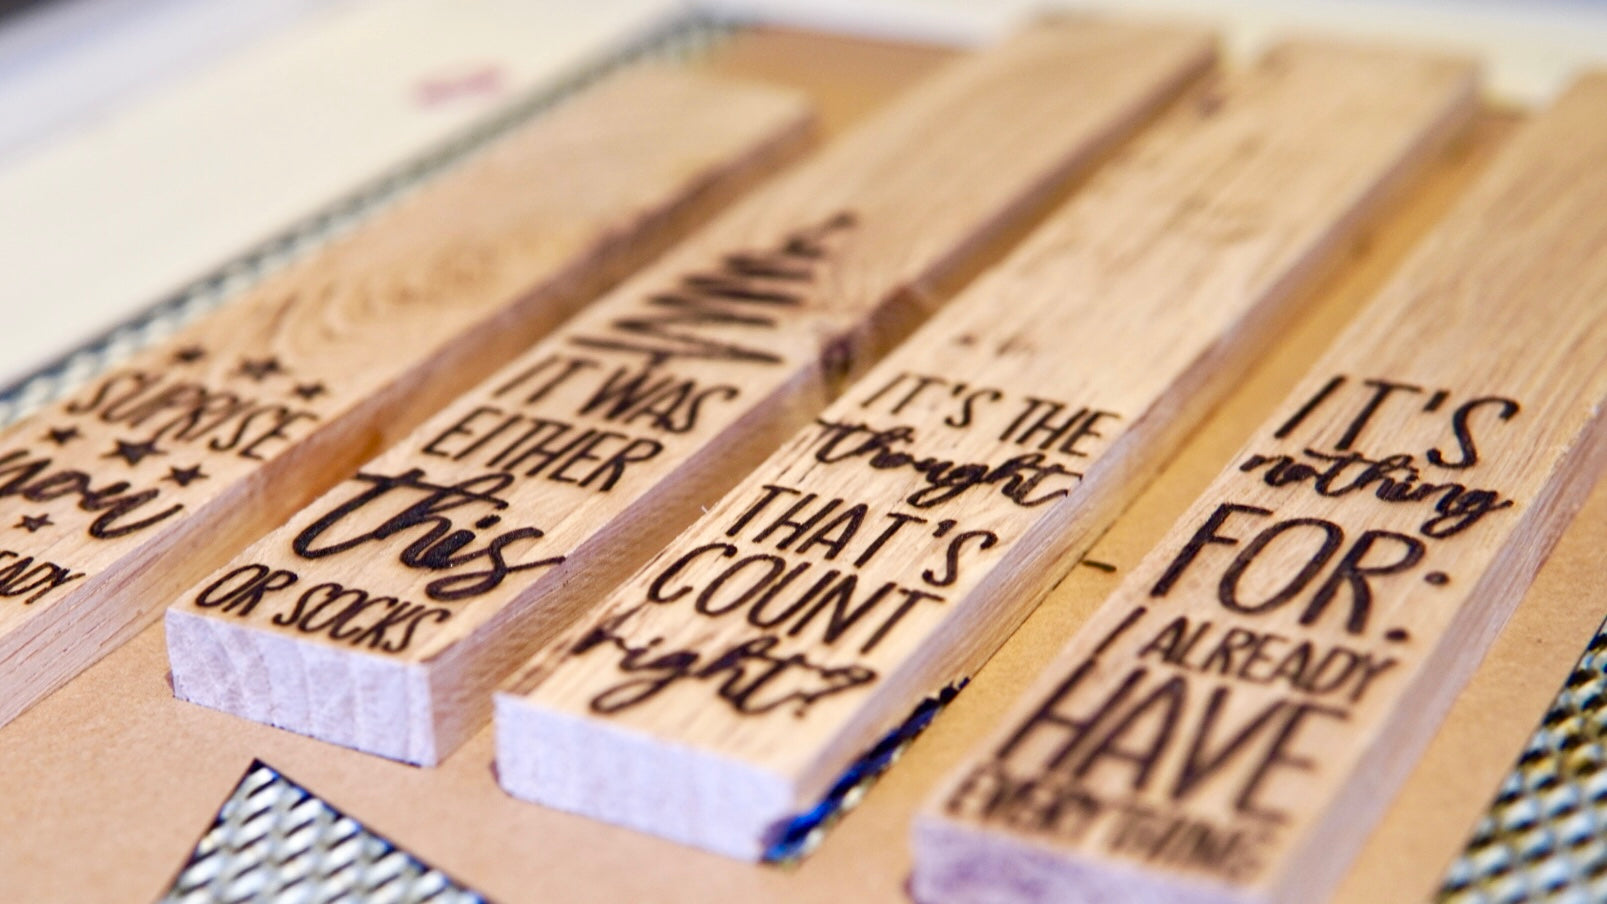
Fortunately, you can find a file with six funny sayings for your DIY wooden gift tags in the Mr Beam design store :
- It's nothing. For: I already have everything.
- Smile and pretend you like it.
- It was either this or socks.
- It's the thought that's count, right?
- Surprise. You already know what's inside.
- Remember. they say less is more, right?
With these sayings you can build mnemonic bridges for whom, which of your gifts is intended. Alternatively, you can also engrave your crafted wooden gift tag on the back with the name or simply print out the respective name with a label printer and stick it on.

What do you need for your wooden gift tags?
- wooden blocks
- the file from the design store
- jute cord
- scissors
- hot glue gun
- Optional decoration for the blocks
- your Mr Beam
Engrave your gift tag blocks with funny sayings
As always, you can find the file for the gift tags in the Mr Beam design store.
You can find it in the top bar after starting BeamOS.
The file for your wooden gift tags is designed for the standard block dimensions of 2.2 cm x 16 cm. Upon opening, you will see a red and blue cutting line and an engraving.
The blue cutting line ensures a clean border for the engraving of your DIY wooden gift tags.

A template for precise engraving of your DIY wooden gift tags
Since the file is designed in such a way that the engraving also uses the maximum width of the blocks, it is important to get an engraving that is as perfectly placed as possible. That's why I strongly recommend working with a template for your DIY wooden gift tags.
When you have loaded the file into the workspace, the first thing to do is to laser your template. To do this, place a piece of paper, cardboard or kraft paper in your Mr Beam. You can also use leftovers for the six gift tags. Attach them with magnets to keep them in place.

With the laser job for your stencil, you first skip the engraving and the blue cutting line. For the material, you choose the settings that match your chosen material for the template and start the laser job after focusing.

When your template is lasered, place your wooden blocks exactly in the recesses provided.
A beautiful engraving thanks to a cut line as a border
Now it is important : The laser head must be refocused on the wooden blocks!

Start the laser job again, but this time for engraving your wooden gift tags. To do this, skip the red cutting line and place the engraving and the blue line in the engraving field.

For the wooden blocks, I chose solid wood as the material and the lighter shade of it. For engraving on wood, I always recommend reducing the line spacing from 0.15mm to 0.1mm. This results in a much nicer engraving image.
How wooden blocks can now be turned into DIY gift tags
In principle, you can let your creativity run free when decorating your gift tags. In the end, the only important thing is that you have a way to attach it to the gifts. So that the funny engraving doesn't disappear under too much decoration, I think less is actually more here.
A little jute cord, some glitter, a little sparkle or fir branches, and your wooden gift tags are ready. But no matter what you decide, you will definitely need your hot glue gun now.
Plain jute cord wrapped around the wood
Very simply, you can wrap some jute cord around your wooden gift tag. They are available in brown, but also in beige tones. You fix the start and end point with hot glue on the back of the wood. Simply cut off the protruding ends with scissors.
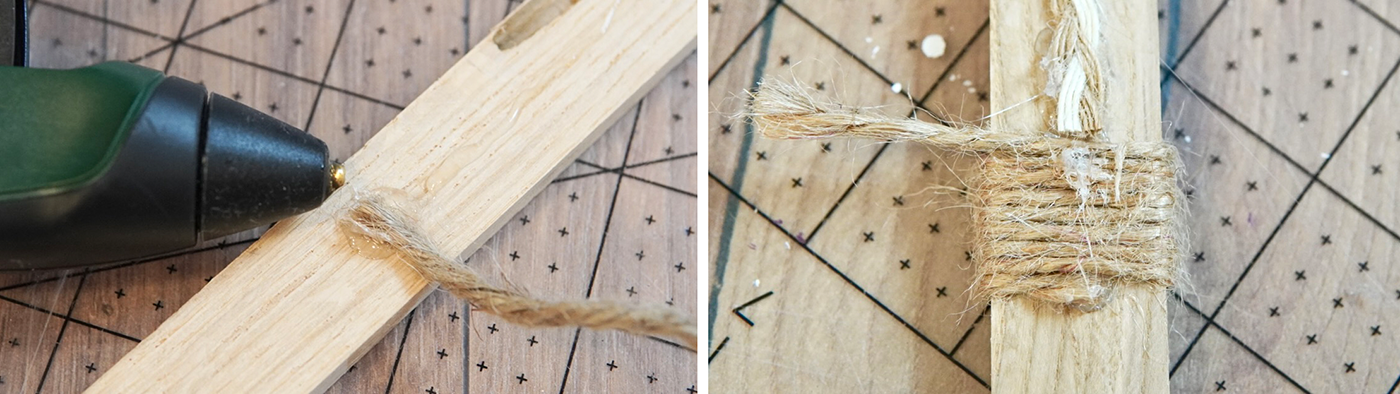
You can also use your hot glue gun to attach your cord for hanging or fastening to your wooden gift tag.

Some pine green on the DIY wooden gift tag
If you have small pine branches, whether real or fake, you can also use them to decorate your DIY gift tags. Either stick them directly onto your gift tag or secure it by wrapping it with string, which you attach to the back of your wooden block with hot glue.

Some Christmas tree decorations on the wooden gift tag
To attach a small Christmas tree ball to your gift tag, you first have to wrap jute cord around your wooden block and glue it in place.

You now tie a small string to your Christmas tree decorations, with which you knot the Christmas tree ball to the jute ribbon.

You can also glue other Christmas tree decorations, such as snowflakes, directly to your DIY wooden gift tag with hot glue.
Glue a cord to the back of the block so that you can tie it to a present. In no time at all, you've made a couple of funny gift tags out of wood.
I wish you a lot of fun imitating and this year a little less chaos with the gifts than usual.
Your Rina