Surrounded by smartphones and laptops ... quickly an email here, a message there. Digital. Fast -moving. And then you open your mailbox and Hold a greeting card in your hand. Handwritten by a dear person.
What triggers you in you? You are happy because she touches your heart or not?
In a special, emotional, completely different way than a dear email.
And why? Because nothing is more authentic than the handwritten word.
Send joy - handicrafts a greeting card
Did you read my blog article for Tinker with clay paper?
Since then the Mr Beam My plotter for paper projects.
Of the Mr Beam Work here Simply faster and also lasers filigree elements played out easily. I am still completely fascinated.
If you also have a plotter, you will surely know the popular "Print & Cut" function for Greetings or other paper projects.
Quickly in the graphics program, such as Adobe Illustrator, drag a digipaper into the mold, print out with passenger brands and your plotter Cut it out exactly thanks to the markings.
You can of course also use detours Mr Beam - and I'll show you in mine Tutorial how.
- Force paper or clay paper
- Printer
- Photo paper (matt or shiny - depending on your preference)
- Adhesive (adhesive or liquid adhesive)
- tweezers
- Someone you want to send a little greeting.
Yours Greeting card It is best to make thicker paper. Strength or clay paper is very suitable here so that the card is stable and also survives shipping.
For the decoration you take photo paper. Glossy or matt is up to you. This will result in the colored accents of the card - the font color, the background and depending on the decorative elements. Let your creativity flow!
Lasing your greeting card is done quickly
The basic card is first lasered.
To do this, you put the strength or clay paper in your Mr Beam And open the file in your work area.
The black line is engraved. However, not as an engraving, but as a separate cutting job. As a result, the Mr Beam A line and not, as usual with engravings, pixels for pixels.
This line serves later than buckling aid for your greeting card.
With the power paper I use, it turned out to be better when I engraved the kink line inside. With the engraving outside, the paper is immediately torn when kinking. If this is also the case with your paper, you can easily mirror the file in the work area.
I have ... you marked the mirror button in the picture. Just click - done.

You cut the red lines normally with the right settings for your paper. For the buckling aid of the greeting card, If you reduce the intensity, you also lower the passages to one instead of two, and then increase the speed.
You can see my settings for cutting my power paper for the greeting card below, but: Unfortunately, paper is very different in its properties, so that you have to try out a little here beforehand which settings are the right one for your paper.

And now the Mr Beam fly over the paper, and you laser your greeting card. And I love this moment when you raise your project and simply stay lying down, as small as they are. Wow!

Your basic structure to your Tinker greeting card, now. Only your individual decoration with color accents is missing.
The decoration for your DIY greeting card
Out of "Print & cut" At the plotter, “Print then laser” is in the Mr Beam.
As? Very easily: Download the elements for the font color, the background and your decoration from the file into your graphics program.
The rectangles (black lines) in the file are the Color fields of the greeting card.
Fill them in your graphics program with a color of your choice or a nice digipaper. If necessary, you still have to adjust the size of the rectangle for your decoration.
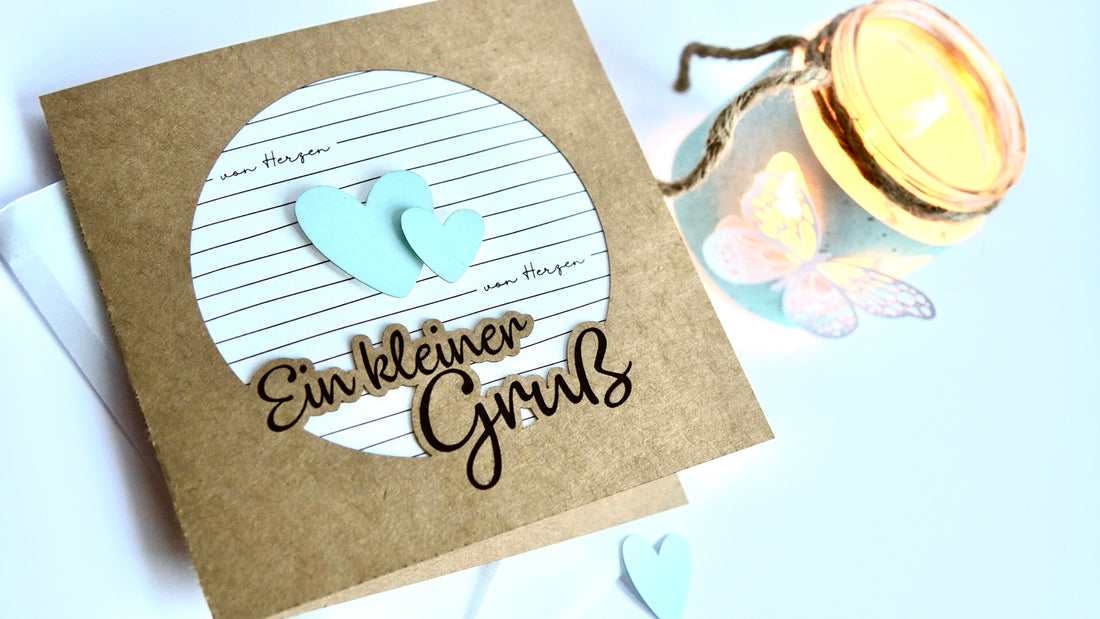
I got myself for a black one Lettering, mint -colored heart and as the background of the circle a digipaper of Small gods decided.
You can use your printer to print this out on photo paper.
Tip: A nice photo is also suitable as the background for the circle!

Now you put the printed sheet in yours Mr Beam and position in the work area The vagina files for the elements on your previously printed colored fields.
Paper lasers the Mr Beam Of course effortlessly. Still, I have them laser settings the respective, printed colors adjusted somewhat.
The easiest way to do this is if you have to assign different colors to the lines beforehand.

Also, important here: the inner parts of the script, for example from the “L” and “G”, do not throw away!
Tinker greeting card
Now it goes to tinker or glue. First, you stick the background of the script. A few small drops of adhesive are enough.
Then the background follows. Distribute small drops of adhesive evenly around the circle and press your background well.

Turn over the greeting card and stick the still missing elements of the script.
I attached the hearts as decorative elements with foam adhesive pads in different thicknesses to maintain a nice spatial effect.

Now is Your handicraft greeting card Ready to put a smile on your face to a dear person!
Your Rina


