
Stencils are versatile tools. No matter if they are used to create a small work of art, or if they are used as a measuring tool. In which The possibilities of using self-created stencils are almost endless. Therefore, it was urgently time that we publish an article on this topic. After all, we have the perfect tool at our disposal with which stencils can be easily produced.
Creating templates - application examples
The most obvious area of application of a stencil is, of course, the creative living out. Here you can use them on the one hand to make it easier for you to making calibration and painting easier, on the other hand - and that makes it really exciting - you can use the stencil for spray paint. Simply place the stencil flush on the material on which you want to spray, secure it from slipping if necessary, and you can start spraying on it. Without complicated spray skills, without the problem that everything is lost if you make a small mistake when spraying.
As a second important field of application of self-created stencils, the Use as a measuring tool. This is especially useful if you want to use the template to make several identical things, but do not want to re-measure each time how big the final product should be. Of course, for the production of such things, the Mr Beam very suitable yourself, but if you want to work with a material that is not laser-able, you can easily get a remedy.
Creating Templates in Adobe Illustrator
Now that it has been clarified what to Can use stencils, now let's provide you with a few more concrete examples. Therefore, in the following chapters, we will show you short step-by-step instructions for small stencil projects.
Letter Templates
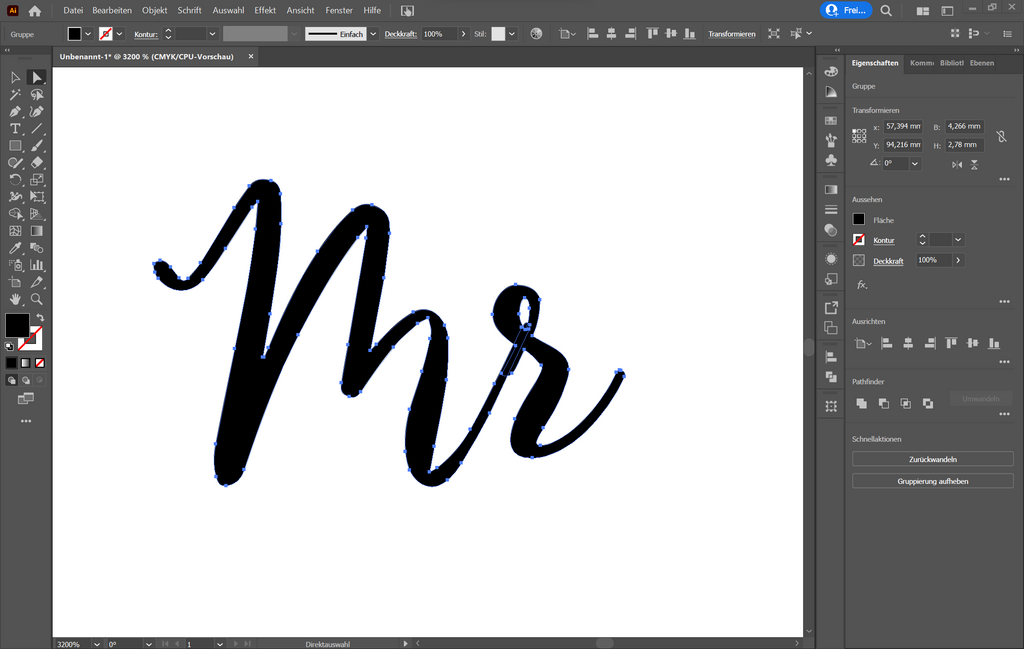
Let's start with a simple Letter Template. We want to play through the whole thing with the example of “Mr”. First, you need to think about whether you want to create a positive or negative stencil. We will go through both step by step here.
- If you have decided on one of the two variants, you can now choose a suitable font. The easiest way would be if the letters of the fonts are coherent, as is the case with cursive writing. This ensures that the positive stencil consists of one piece. If this is not the case, you can of course also laser several individual stencils, or connect them manually with paths later.

- Now the font has to be converted into paths so that you can edit it in even more detail. To do this, click on “Convert to paths” at the bottom of the right panel under “Properties”.
- You can then adjust the paths as you wish. In particularly thin places, for example, it is recommended to make the connections a little thicker so that the Positive Stencil it is also stable enough.

- Should you have a Want to make a negative template, you have to make sure that no individual parts are created. In our example, with the small R, the small dot in the middle would simply fall out. This can be easily avoided, for example, by closing this gap. Alternatively, you can also install a small connecting bridge at a suitable location if you do not want to neglect the interior.

- The next step is only the step that will make your writing a real Template power. Now combine all objects with the Pathfindertool, which should also be lasered together at the end. Then you set a contour and remove the area filling. This is the only way the Mr Beam will recognize that you want to cut along the font instead of engraving it.

- In principle, the file of your template is already ready, and you can save it as SVG. If you want to create a negative template and do not want to use all the material inserted into the Mr Beam, you can still use it in the Mr Beam Software a rectangle or an ellipse create around the template.
Create a form template
Also, with the form template, you have the choice between negative and positive template again. Here you can either convert an already existing image into paths or create a completely new shape with the Pen tool. If it is a simple form without individual parts, you can even create a 2 in 1, negative and create a positive template. In our example, this is also possible due to the small recesses on the right and left.

Create a measuring tool template
Creating a template as a measuring tool basically has exactly the same process in Illustrator as the normal shape template. At the end of the day, the field of application is different only after that. In most cases, it also makes sense to produce a measuring tool template from a firmer material, as a normal drawing or spray stencil. But there are more details in the next chapter.
Material of the stencils
The choice of material depends entirely on how you want to use your stencil later. At Spray and drawing stencils it is recommended, relatively thin material, such as Kraftplex or cardboard. If it gets too thick, it can happen, for example, that you do not get quite to the edge due to the high edge when spraying. However, if it is too thin again, you have to be careful that you do not slip off with the pen when drawing or even damage the stencil.
===product===
mr-beam-premium wooden box
===product===
kraftplex-set of 5
===product===
mr-beam-acrylic-black
===product===
When you stencil as measuring tools if you want to use it, it is recommended to use as stable a material as possible, such as Wood or to use Kraftplex, because the template may be exposed to much higher stress than if you just touch it.

The Mr Beam stencils in use


In our example, we lasered the stencils onto cardboard and then once as a negative- and once as a positive-template used for spraying. As I said, however, there are endless possibilities to use self-created stencils. That's why we are very curious what you made of it! So don't be afraid and as always share your results with the community under the hashtag #madewithmrbeam.
See you next time!


