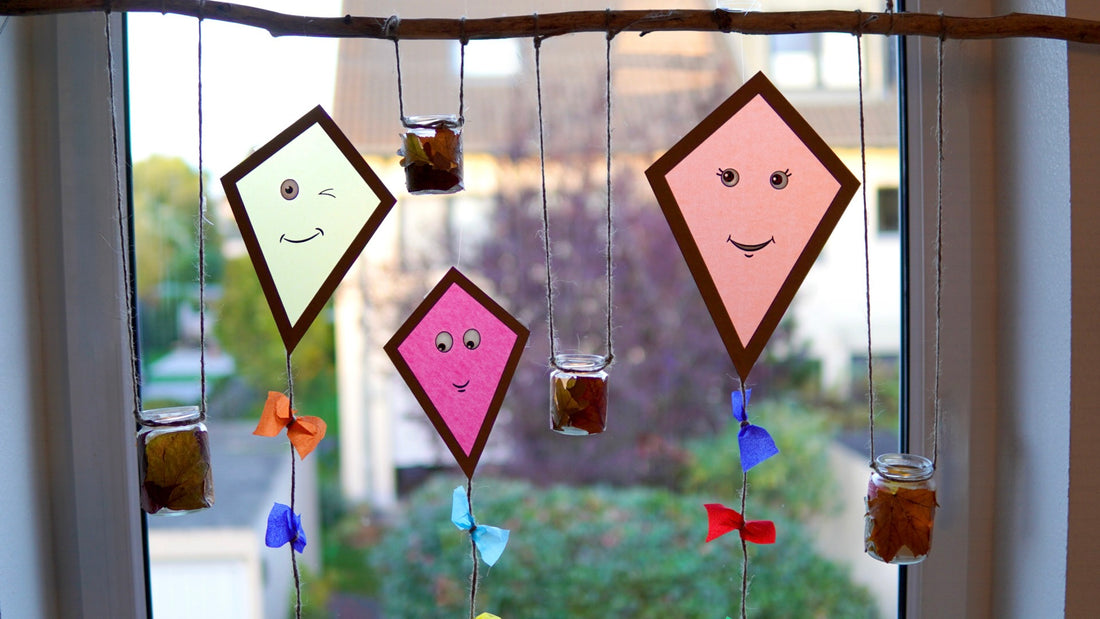
Beautiful decorative elements can be conjured up from a wide variety of materials in just a few simple steps - such as this hanging, autumnal window decoration.
Branches are always suitable for window decorations, to which the decoration can be attached. We actually have a branch hanging from every window all year round. Depending on the season or festival, we will then attach our hanging window decorations there.
So if you don't have a branch on the window yet, you need one by now at the latest.
The very first step in this tutorial : go for a walk and collect beautiful, colorful, different sized leaves. These are then dried - preferably for a day or two . I'll explain how to do this later in this tutorial.
Material for your hanging autumn decorations in the window
You need for your autumn decoration on the branch :
- kraft paper or cardboard
- black and white paper
- Colourful tracing paper
- Glue
- scissors
- jute cord
- Colourful crepe paper
- old jam or baby food jars
- paste
- Paint brush
- leaves
- newsprint
Drying the leaves for your autumn window decorations
The first step this time is drying the leaves. You should do this before anything else, as it takes the longest time. First remove the stems of the leaves.
I recommend several sheets of newspaper as the bottom layer for pressing and drying. Now spread out as many sheets of newspaper as will fit on one page. But make sure they don't overlap.

Then another layer of newspaper. At least two pages thick.
Spread out leaves again and place newspaper over them, and so on until all the leaves are spread out.
Now put something heavy on top of the stack of leaves and newspaper and wait at least a day, depending on the thickness of the leaves, two days is better.

Make hanging kites for the autumn window
While the leaves for the lights are drying you can make your kites.
You can find the dragon shape and the eyes as a file in the Mr Beam design store .
The eyes of my dragons are from the “Autumn Leaves Wolves” file.
I made the grinning mouths myself. Alternatively, you can also paint them on afterwards with a wide, black pen.
Once you've loaded the kite shape file into your design library, you can open it in your workspace and customize it to suit your needs. Duplicate the shapes as you will need a front and back. This makes the kite more stable, it looks equally beautiful from the front and back, and the line can be attached better.
You put the kraft paper in your Mr Beam and let him laser your dragon shape.

Use the white and black paper for the faces of your dragons.
Because paper is so thin, I was able to laser both colours at the same time using the same settings. The most important thing with paper is that the laser head does not move too slowly because the paper can easily catch fire.

Crafting the dragon body
Apply glue all the way around the shapes, stick the tracing paper in place and cut off any excess. Now comes the right form. Apply glue again. However, you now leave out the lower tip so that you can attach the cord there afterwards.

Your dragons for your hanging autumn decorations on the window are now getting cheeky faces. Glue the eyes together. The bottom layer is always black, followed by a slightly smaller white layer and then the pupils. These sometimes consist of one, sometimes of two parts.

Glue the eyes and mouths to the appropriate places on the transparent paper of your dragon.
The kite string with colourful bows
Apply enough glue at the bottom of the tip. Untwist the cord for the kite line a little at the end that is attached to the kite. This makes the cord flatter and creates more surface for gluing. Fold down the tip and press firmly. While the glue is drying, you can support the whole thing with paper-clips or something similar to prevent it from opening again.

Cut your colourful masking tape into roughly equal pieces.
At the level of the string, where you want to create a loop, tie an open knot. Now place a piece of your colourful masking tape in this knot and tighten the knot. Voilà, you already have a loop.
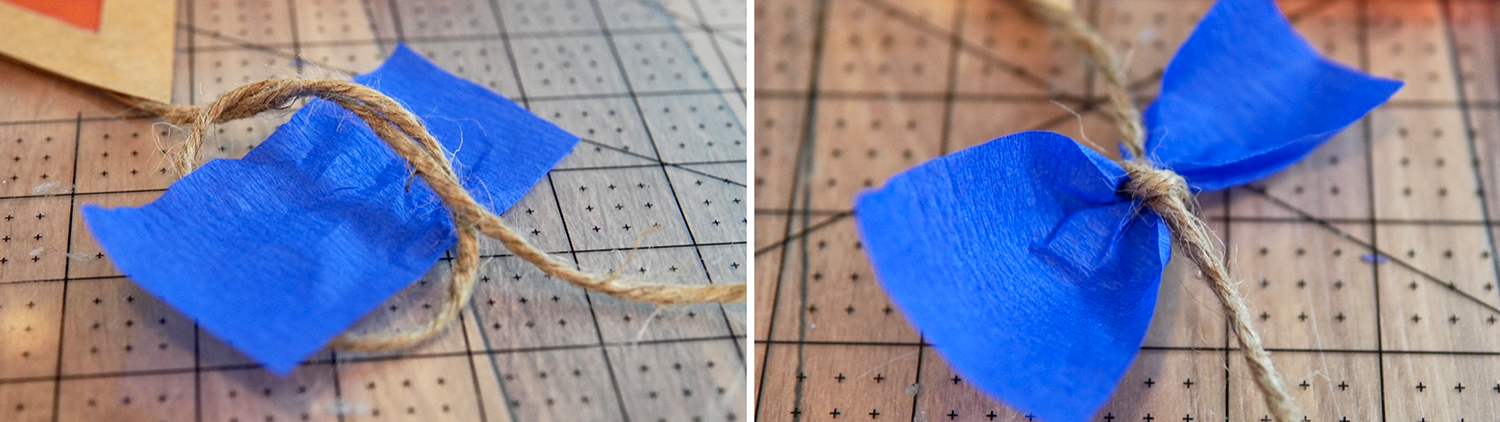
You now repeat this on the string of your kite for your hanging autumn decoration for the window until you have made enough bows. Your kites are now ready and can be attached to your branch for the hanging autumn decoration.
As a small highlight, there are hanging lights for your autumn decorations on the window

After a few days, your leaves will be sufficiently pressed and ready to shine in the autumn window decoration.
Free your sheets from the newspapers and get your paste, brush and jars ready.

Mix the paste in a glass and apply a thin layer to the glass. Save the floor.
Now distribute your dried leaves on the glass as you wish, just make sure that they only overlap minimally, otherwise they won't shine so beautifully in the end. Apply paste to each sheet after laying it on.
When you have glued leaves all around, spread the paste evenly again with the brush and place your finished glass on a washable surface to dry. Depending on the thickness of the sheets and the paste, it may take some time.

Are the kites and jars ready for your fall hanging decorations?
You can put real tea lights or LED candles in your small lanterns.
I like to use my rechargeable LED candles with remote control.
Firstly, you don't always have to replace the candles when they've burned out, and "lighting" and "blowing out" is very easy thanks to the remote control.

You hang your kites on the branch in the window with a transparent nylon cord.
The lanterns need something stronger, here I recommend jute cord. Decorative, suitable colour for autumn and stable.

Have fun tinkering - and wish you a cosy autumn
Your Rina


